
Sitecore
Docker

Victor LaLoggia
Sitecore and Sitecore Commerce Architect
Sitecore on Docker Part 3
Preparing our Development Environment
Flush with our success in building Sitecore 9.3.0 images and successfully running the test container, it’s now time to create our own Docker-hosted development environment.
Prerequisites
1. Setup your development environment: https://doc.sitecore.com/en/developers/100/developer-tools/set-up-the-environment.html
2. Install the Sitecore Docker Tools
3. Install mkcert
4. As I’m illustrating the usage of Sitecore 9.3.0 images for development, we need to build our own local images. For reference: Sitecore 9.3.0 on Docker [Part 1] – Hosting Docker on an External Drive
5. Bookmark Sitecore’s Containers in Sitecore Development documentation. There's a lot of good information there.
Preparation
1. Clone the https://github.com/Sitecore/docker-examples repository.
2. Create a local branch of the docker-examples repository. We’ll be using the \custom-images directory to configure our local Docker environment.
Exploration
There’s a lot going on in the custom-images directory. We should familiarize ourselves with the contents of the custom-images directory:
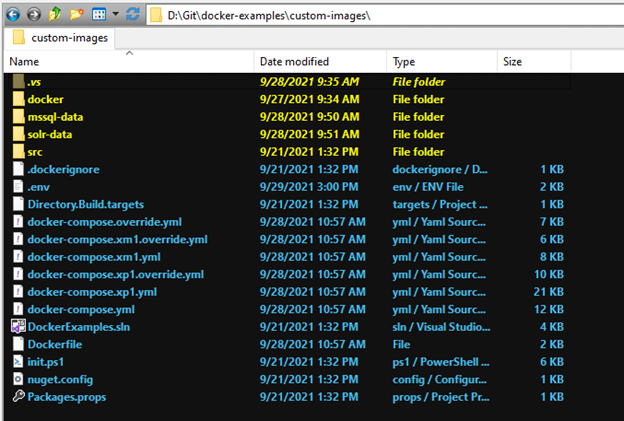
1. \docker
This folder is used for Docker development.
-
\build
Within this directory are Dockerfiles for all Sitecore topology service containers. They are used during the docker-compose process to assemble our own customized Sitecore images. -
\data
Within this directory are our local mounted directories. The path to this directory is assigned to the LOCAL_DATA_PATH variable in the .env file -
\deploy
The child directories of \deploy are deployment targets of the DockerExamples.sln solution. You’ll find the directories mentioned in the DockerDeploy.pubxml files. -
\traefik
This directory holds the TLS certificates and configuration for the traefik Docker Container. The certificates are generated by the .\custom-images\init.ps1 script. -
.gitignore
Instructs Git to ignore the data, deploy, and traefik directories -
clean.ps1
A handy script that empties out the data and deploys folder artifacts
2. \src
This is where we will place our custom code. Out of the box, the Sitecore Docker Examples solution is found here.
3. .dockerignore
The .dockerignore file acts much like a .gitignore file. Any file or directory that matches the expressions in the .dockerignore file will not be added to the Docker Build Context. A Docker Build Context is simply all files necessary to create our desired image. By leveraging the .dockerimage file to include only necessary files in our Build Context, our build time and deployment can be optimized.
4. .env
In this file, we create and assign values to our environment variables for our custom image and Build Context. The syntax rules for this file are straight-forward:
- Each line should be of VARIABLE=VALUE format
- Lines beginning with a # are comments
- Blank lines are ignored
There is no special handling of quotation marks. Quotation marks are part of the VALUE assigned to the VARIABLE.
5. Directory.Build.targets
This is the Build.targets file for the DockerExamples.sln file. Microsoft has some good documentation on this subject here.
6. docker-compose.*.override.yml
These are docker compose override files. Override files allow us to replace or add definitions in another docker compose file, whose prefix is identical. In this case, the docker-compose.override.yml file overrides values in the docker-compose.yml file. Docker has some great documentation on using multiple compose files.
7. docker-compose.*.yml
These are docker compose files for the xp0, xp1, and xm1 topologies.
8. DockerExamples.sln
Our example .Net Solution file.
9. Dockerfile
A Dockerfile is a Docker build file. This Dockerfile contains the instructions necessary to create our own custom image via the docker build command. The custom image will contain the compiled code of the DockerExamples solution. During the docker-compose process, the custom code in this image will be copied into our Sitecore images via the definitions in the .override.yml files.
It’s worth discussing the contents of the Dockerfile:
-
# escape=`
This sets the escape character for our Dockerfile. The backtick is chosen as on Windows as it’s the Powershell escape character. -
ARG BASE_IMAGE and ARG BUILD_IMAGE
This is how we provide a build-time argument to the docker build command. This is equivalent to using the --build-arg parameter on the command line: docker build --build-arg BASE_IMAGE=MyBaseImage –build-arg BUILD_IMAGE=MyBuildImage .
Please note that the value of BASE_IMAGE and BUILD_IMAGE are read from the .env file’s SOLUTION_BASE_IMAGE and SOLUTION_BUILD_IMAGE variables via a transform in the docker-compose.override.yml file. -
FROM ${BUILD_IMAGE} AS prep
The FROM keyword creates a build stage and sets the base image for all subsequent Dockerfile instructions. The AS keyword labels the stage for later reference. The Dockerfile instructions that define a build stage are to be found after the FROM keyword until the end of the file, or the next FROM keyword. -
SHELL ["powershell", "-Command", "$ErrorActionPreference = 'Stop'; $ProgressPreference = 'SilentlyContinue';"]
The SHELL command allows us to define which shell to use for any subsequent instructions found in the Dockerfile. Oddly, the SHELL command must be written in JSON. Therefore our SHELL command is equivalent to executing the following on the command line:>powershell -Command $ErrorActionPreference=’Stop’; $ProgressPreference=’SilentlyContinue’
After this SHELL command, any subsequent RUN commands in the current build stage will use PowerShell as configured, unless that RUN command explicitly declares an alternative executable.
-
COPY *.sln nuget.config Directory.Build.targets Packages.props \nuget\
The COPY command is pretty straight-forward: Copy from source to a destination within the Docker container. In our case, the source is a list of files in the current directory: *.sln nuget.config Directory.Build.targets Packages.props
Which will be copied into the container being built at the root: C:\nuget -
COPY src\ \temp\
Copy all our custom code into the Docker Container being built at: C:\temp -
RUN Invoke-Expression 'robocopy C:\temp C:\nuget\src /s /ndl /njh /njs *.csproj *.scproj packages.config'
Using Powershell, as defined by the SHELL command on line 7, use robocopy to copy all .csproj, .scproj, and packages.config files from the Docker Container hosted C:\temp directory to the Docker Container hosted C:\nuget\src directory -
FROM ${BUILD_IMAGE} AS builder
Start a new build stage “builder” -
ARG BUILD_CONFIGURATION
Import the .env file’s BUILD_CONFIGURATION value into the “builder” build stage -
SHELL ["powershell", "-Command", "$ErrorActionPreference = 'Stop'; $ProgressPreference = 'SilentlyContinue';"]
Configure PowerShell for the current build stage -
WORKDIR C:\build
The WORKDIR command sets (or creates if it doesn’t exist) the working directory within the Docker Container being built. Any subsequent RUN, CMD, ENTRYPOINT, COPY or ADD commands, in this build stage, will use the WORKDIR. -
COPY –from=prep .\nuget .\
This COPY command is abiding by the WORKDIR directory created on line 21. It is copying files prepared in the “prep” build stage, starting on line 6. The files are being copied from C:\nuget to C:\build, within the Docker Container being built. -
RUN nuget restore
This RUN command is abiding by the WORKDIR directory create on line 21, as well. It is essentially executing: nuget restore C:\build -
COPY src\ .\src\
From within the Docker Container, copy all files from C:\src to C:\build\src\ -
RUN Invoke-Expression 'robocopy C:\build\src C:\out\transforms /s /ndl /njh /njs *.xdt'
Copy all C:\build\src\**\*.xdt files to a new directory C:\out\transforms, within the Docker Container being built.
Do notice that we need to specify “C:\build” in this case as robocopy knows nothing of our WORKDIR declaration. -
RUN msbuild .\src\DockerExamples.Website\DockerExamples.Website.csproj… and RUN msbuild .\src\DockerExamples.XConnect\DockerExamples.XConnect.csproj...
Build our projects as prepared in C:\build\src, within the Docker Container. -
FROM ${BASE_IMAGE}
Create a new build stage -
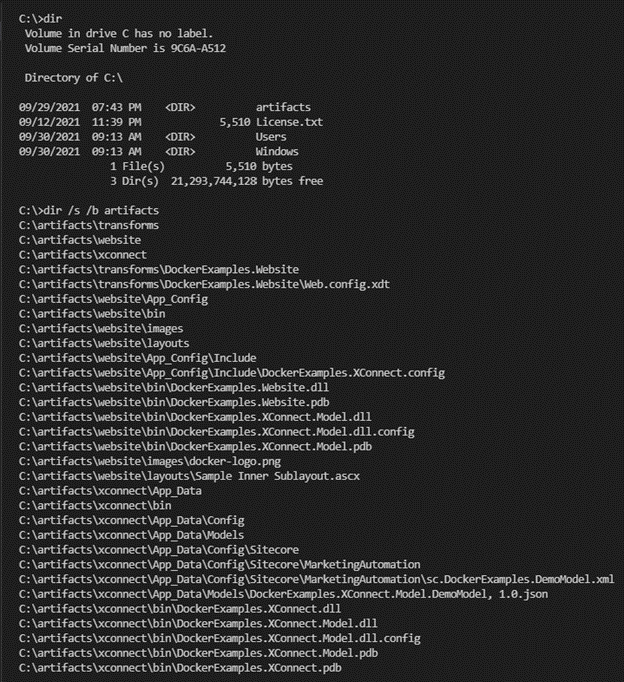
WORKDIR C:\artifacts
Create a new work directory in the Docker Container at C:\artifacts -
COPY --from=builder C:\out\website .\website\
Copy the files built by msbuild in the “builder” build stage to C:\artifacts\website, within the Docker Container.
The remaining COPY –from=builder… commands copy the transforms and xconnect code to C:\artifacts
After a successful build, we'll have a docker image containing a c:\artifacts directory:
10. init.ps1
This script is used to populate the .env file, create traefik TLS certificates, and write hosts file entries. Invoke this script before your first run of docker-compose.
11. nuget.config
The DockerExamples.sln Nuget configuration
12. Packages.props
Our global configuration of Sitecore NuGet packages
Now that we’re familiar with our new domain, it’s time to create our new development environment. All the salacious details are to be found in my upcoming blog post: Sitecore 9.3.0 on Docker [Part 4] - Creating a Sitecore 9.3.0 Docker Development Environment.
Documentation
https://doc.sitecore.com/en/developers/100/developer-tools/containers-in-sitecore-development.html