
Type

XCentium Blogs
Technical
Sitecore + Docker Developer Environment - Part 3
Sitecore + Docker Developer Environment - Part 3
Oh boy... Part 3 maybe should be entitled "Part 3 [weeks later]". But, here we are. Let's do this!
In Part 1 of this series, I talked about the basics of getting a Vanilla Sitecore instance up and running in Docker. In Part 2, I talked about how to deploy code to your Docker container and how to debug that code. In this post, I am going to go over how to set up your Sitecore Docker container to serve its sites via HTTPS, and how to configure them to support multi-site urls. As with most things we do as developers, we're taking the work of others and adapting it to fit our needs.
To start, we are going to leverage the windows hosts-writer Docker image. There was a version of it that was a little finicky, but Rob fixed it here: http://rockpapersitecore.com/2020/01/maintain-your-hosts-file-with-a-docker-container/. Thanks, Rob. To use the hosts-writer, we just need to update our docker-compose.yml file with an additional service. Add this to the following code to the top of your docker-compose.yml:
  monitor:
    image: rahnemann/windows-hosts-writer:1.0-nanoserver-${NANOSERVER_VERSION}
    volumes:
      - C:\windows\system32\drivers\etc:C:\driversetc
      - source: '\\.\pipe\docker_engine'
        target: '\\.\pipe\docker_engine'
        type: npipe
But, I haven't downloaded any hosts-writer images... Docker is smart enough to go search online for the image when it can't find it on your machine. Next time you run docker-compose up, it will automatically retrieve the image it needs. You can go ahead and do that now. The really cool thing about the hosts-writer is that you don't really need to provide any specific hosts file entries for it to do something neat:

The containers automatically get hosts file entries to match their container names on startup. This is cool, but not entirely practical for what we need. In a multi-site Sitecore install, we need specific host names to resolve to the correct content in the tree. I have also dealt with some cases where an external service uses origin URL checking to validate an inbound request. Subsequently, I need to be able to serve my site at one or more specific URLs. This is pretty simple with the hosts-writer installed. Modify the cm section of the docker-compose.yml to include some additional host names:
    networks:
      default:
        aliases:
          - sitecorelocal.hostnameone.com
          - sitecorelocal.hostnametwo.place
          - hostnamethree.com
Re-run the docker-compose up command, and docker will re-generate your CM. If you take a look at the hosts file on your machine, you'll now see additional entries for the custom host names you specified.

Now we can serve all of our sites at the proper urls, but they are still just over HTTP. Typically, a standard (non-containerized) install will generate a self-signed cert for Sitecore. Certs are not baked into the images, because the images are generic. So, we have to add them to the container after the image has started up. This is simple enough to do with this: docker-https.
The linked repo contains all of the tools needed to generate a certificate for your Sitecore site, and link it to your container to serve sites via HTTPS. A small modification by yours truly adds support for multi-SAN certs, so you can bind multiple domains to the cert and use it for multi-site instances, too. To get up and running, here is what you do:
- Grab the startup folder from the repository, and put it next to your docker-compose file.
- Execute the createcert.ps1 file via PowerShell. The default domain for the cert will be *.dev.local, however you can pass one or more domains into the cert using the -dnsName parameter.
- Mount the startup folder as a volume to your cm container
- Update the entrypoint of your container to run startup.ps1 (instead of Development.ps1). Don't worry, startup will call Development, so you can still do code deployments and debugging.
- Add a "HOST_HEADER" value to your environment variables. The value of this parameter would be the host names of your multisite instance.
- Add a port binding for HTTPS - 44002:443
If you've done all this, then your CM container maybe looks something like this:
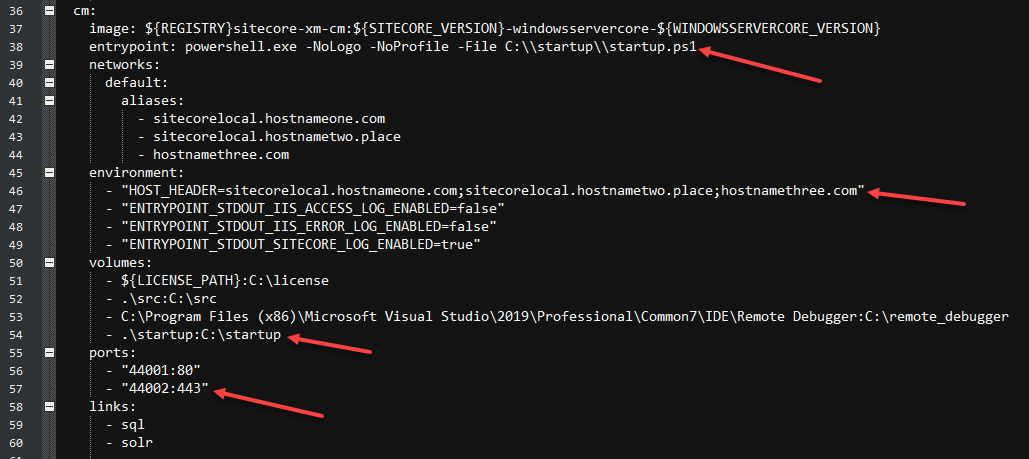
Re-run the docker-compose up command to regenerate the container, and voila! You now have a Sitecore multi-site instance running with secure URLs.
That's the end. All of the important basics for getting a local development environment up and running in Docker. Shout-out to the community for help in figuring this stuff out along the way, maintaining the repo, and of course developing extra tools to make all of our lives easier. Happy Sitecore'ing!!