Sitecore content hub and azure service bus

Sergey Yatsenko
Sr. Director, Sitecore MVP
How to Send Messages from Content Hub to Azure Service Bus
Introduction
This post is a walkthrough, explaining how to set up a queue in Azure Service Bus and then configure an Action and the Trigger in Content Hub to send message notifications to that Service Bus when select entities are getting created or updated in Content Hub. This mechanism might come handy in various integration scenarios where 3-rd party apps and services need to be notified about changes in Content Hub in close to real-time manner.
Azure Service Bus Action in Content Hub
Content Hub provides a special type of Action type, Azure Service Bus" (ASB), which together with Trigger allows sending a message notification to ASB every time a given entity is created, updated, or deleted. This is a powerful integration mechanism, which enabled close to real-time updates flowing from Content Hub to any external system, which can read messages from Azure Service Bus. Such external system can be on on-premise service or, say, an Azure Logic App, which upon receiving notification would perform some custom business logic, e.g. send an email or text notification, create, update or delete a related entity in external data provides, trigger processing or action in the 3-rd party system. One good example is Sitecore's own CMP Connector, relying on the Azure Service Bus queue to process change notification messages incoming from Content Hub to trigger the process of updating related content in Sitecore XP Content Tree.
This post is a walkthrough, explaining how to set up a queue in Azure Service Bus and then configure an Action and Trigger in Content Hub to send message notifications to that queue.
Setting up Azure Service Bus and Topic
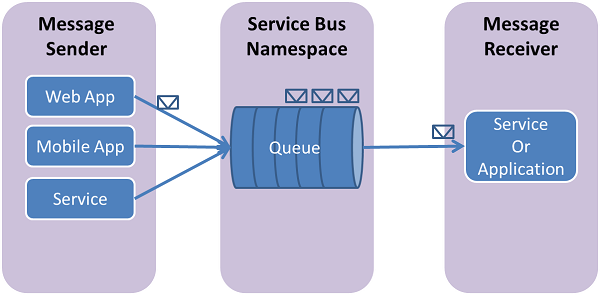
Azure Service Bus is a messaging service on the cloud, which can be used to connect applications, services, and even devices running in the cloud or on-premises to communicate with each other in reliable and close to real-time manner. Microsoft has great documentation set on this topic. Steps for creating Azure Service Bus are pretty straightforward (Azure subscription will be required, but queue can be free or very inexpensive, depending on selected tier).
- Create Service Bus Queue, using Azure Portal (quickest way when automation is not needed), Powershell, CLI, or ARM Template
- Create Azure Service Bus Topic and subscription using Azure Portal, CLI or ARM Template
- Make sure to copy the connection string for a newly created topic described here
Leave the Azure Portal browser window open, we'll get back to it to check for messages in the below steps
Creating the "Service Bus" Action in Content Hub
In Sitecore Content Hub, Actions are components that perform a specific task. These actions can either be manually triggered by a user via the User Interface or automatically run by a trigger or via the APIs. "Azure Service Bus" is one of the Action types which is meant to be used for sending messages to Azure Service Bus.
Sitecore documentation has a good description of Azure Service Bus Action. For the purpose of this exercise we'll need to perform the following steps:
-
Head to Content Hub admin page (Click on a cogwheel at the top right corner of the page)
-
Navigate to Actions and click on "New Action" (top-right corner above the action list)
-
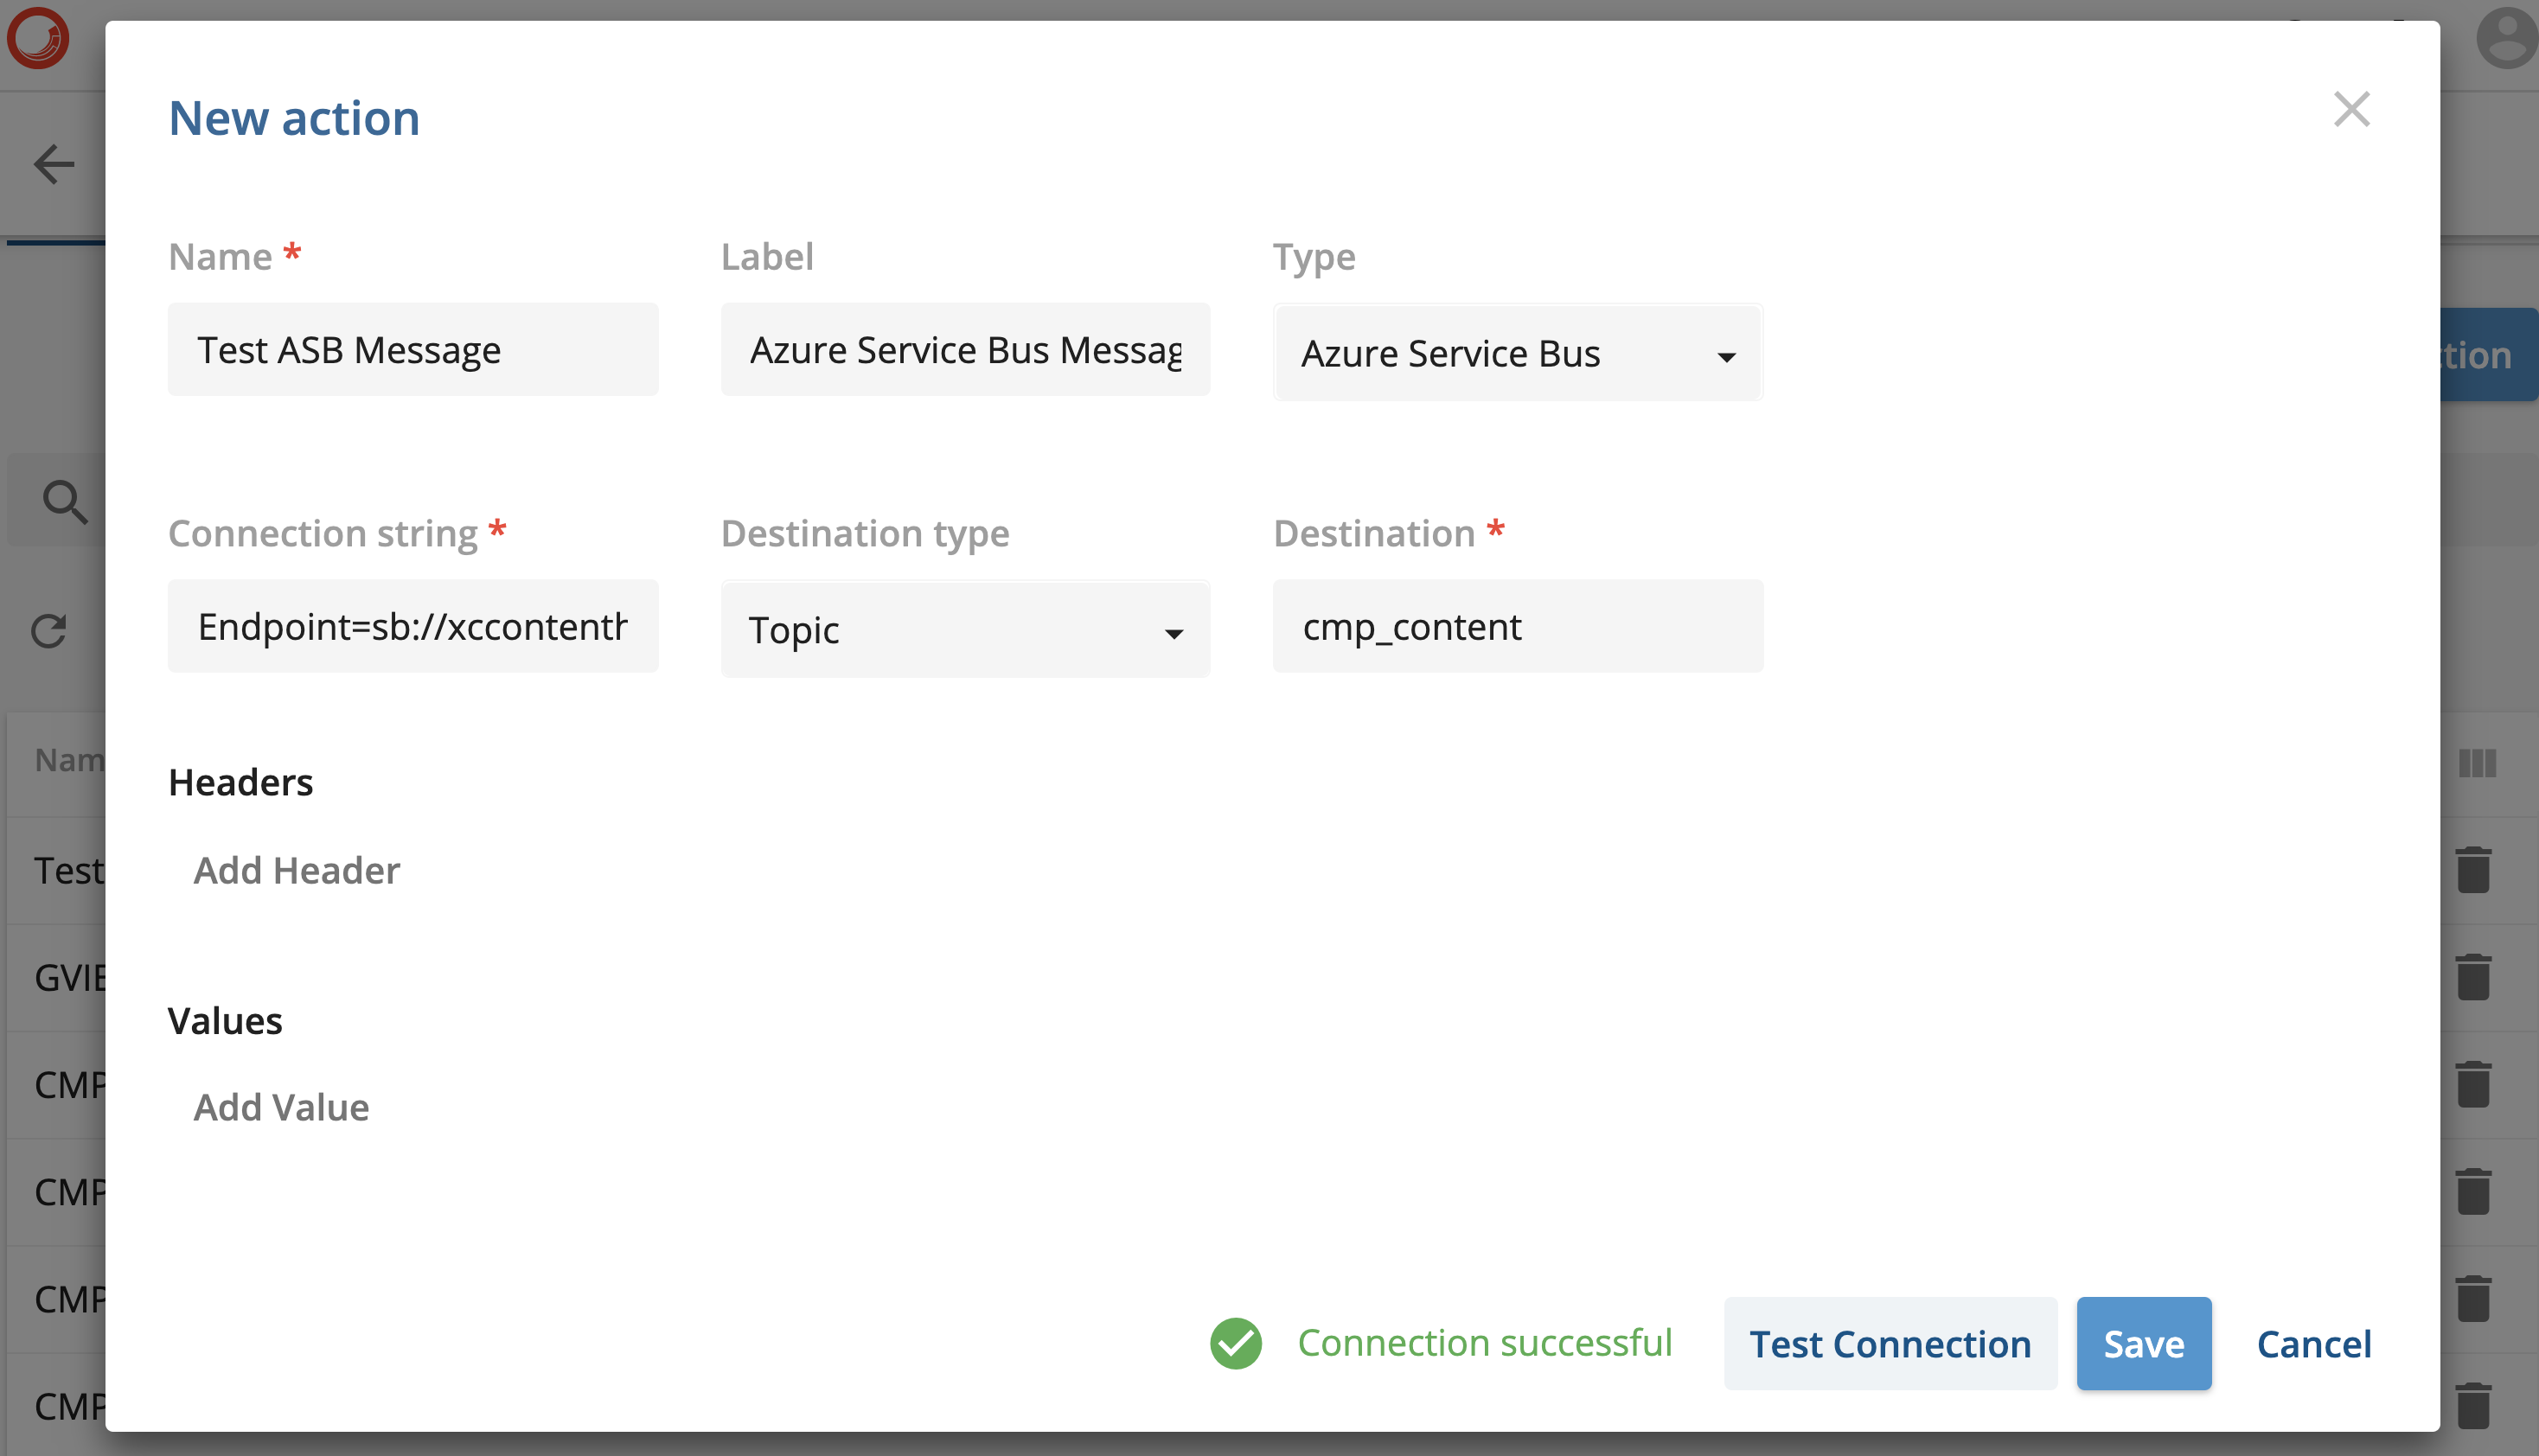
Choose "Azure Service Bus" as the Type, "Topic" as Destination Type and populate name and optional Description as needed
-
Connection string has both queue and topic in it, so it needs to be split in two parts. Copy connection string from the topic, created on step 3 of the previous section and split it as follows:
- Copy the left side of the string, that goes before ";EntityPath=" (without the ";EntityPath=" part) and paste it into the "Connection String" field
- Copy the right side of the string, going after ";EntityPath=" (without the ";EntityPath=" part) and paste it into the Destination field
-
Click "Test Connection" and a green "Connection successful" notification will be shown at the bottom if everything is correct

Adding Custom Properties to ASB Message (optional)
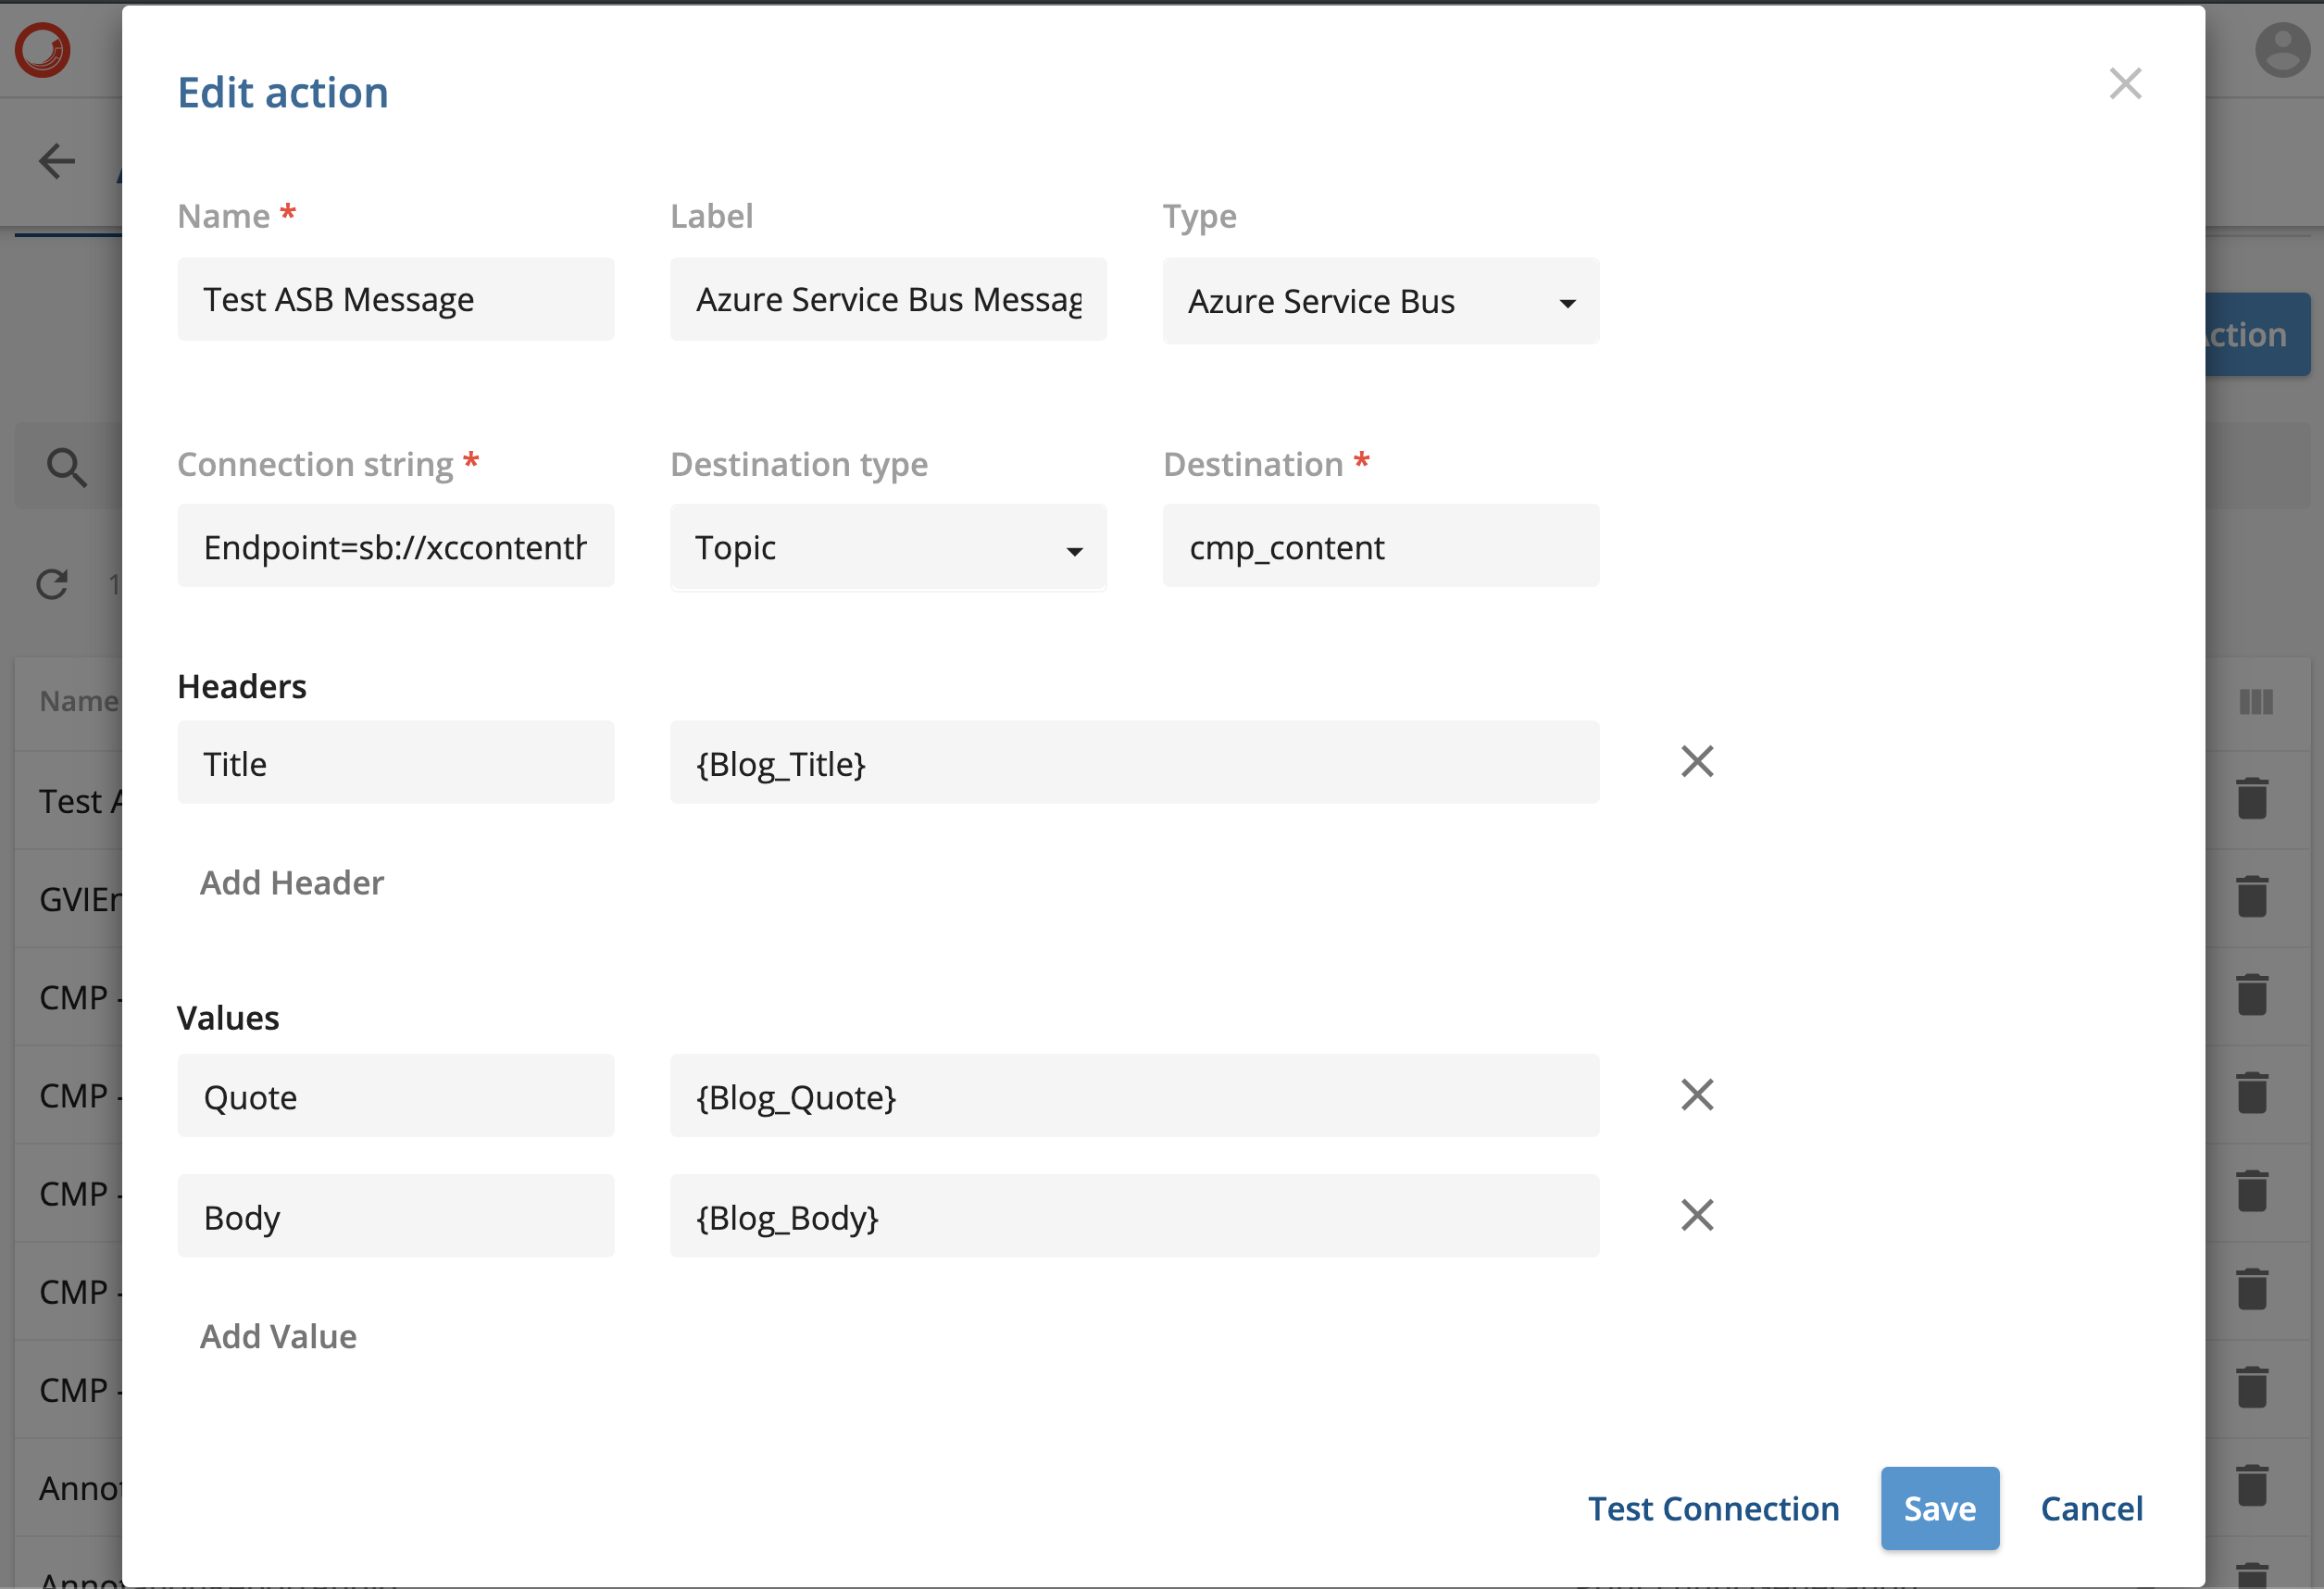
Content Hub provides a handy option, which allows adding custom headers and entity fields directly to ASB message. Values for those fields can be static or can come directly from the context entity (the Entity being affected). The receiving party can always read the rest of the entity data via Content Hub Entity API, but embedding needed data directly into the ASB message can help to skip such an extra step and simplify things a bits. The syntax for context variables is the same as for display templates (e.g. placing {Title} in the value field pulls the value of the entity's Title property. When using a relation name, the value will contain the target entity's identifier. Refer to Sitecore's Content Hub documentation for more details on setting up the Azure Service Bus Action.
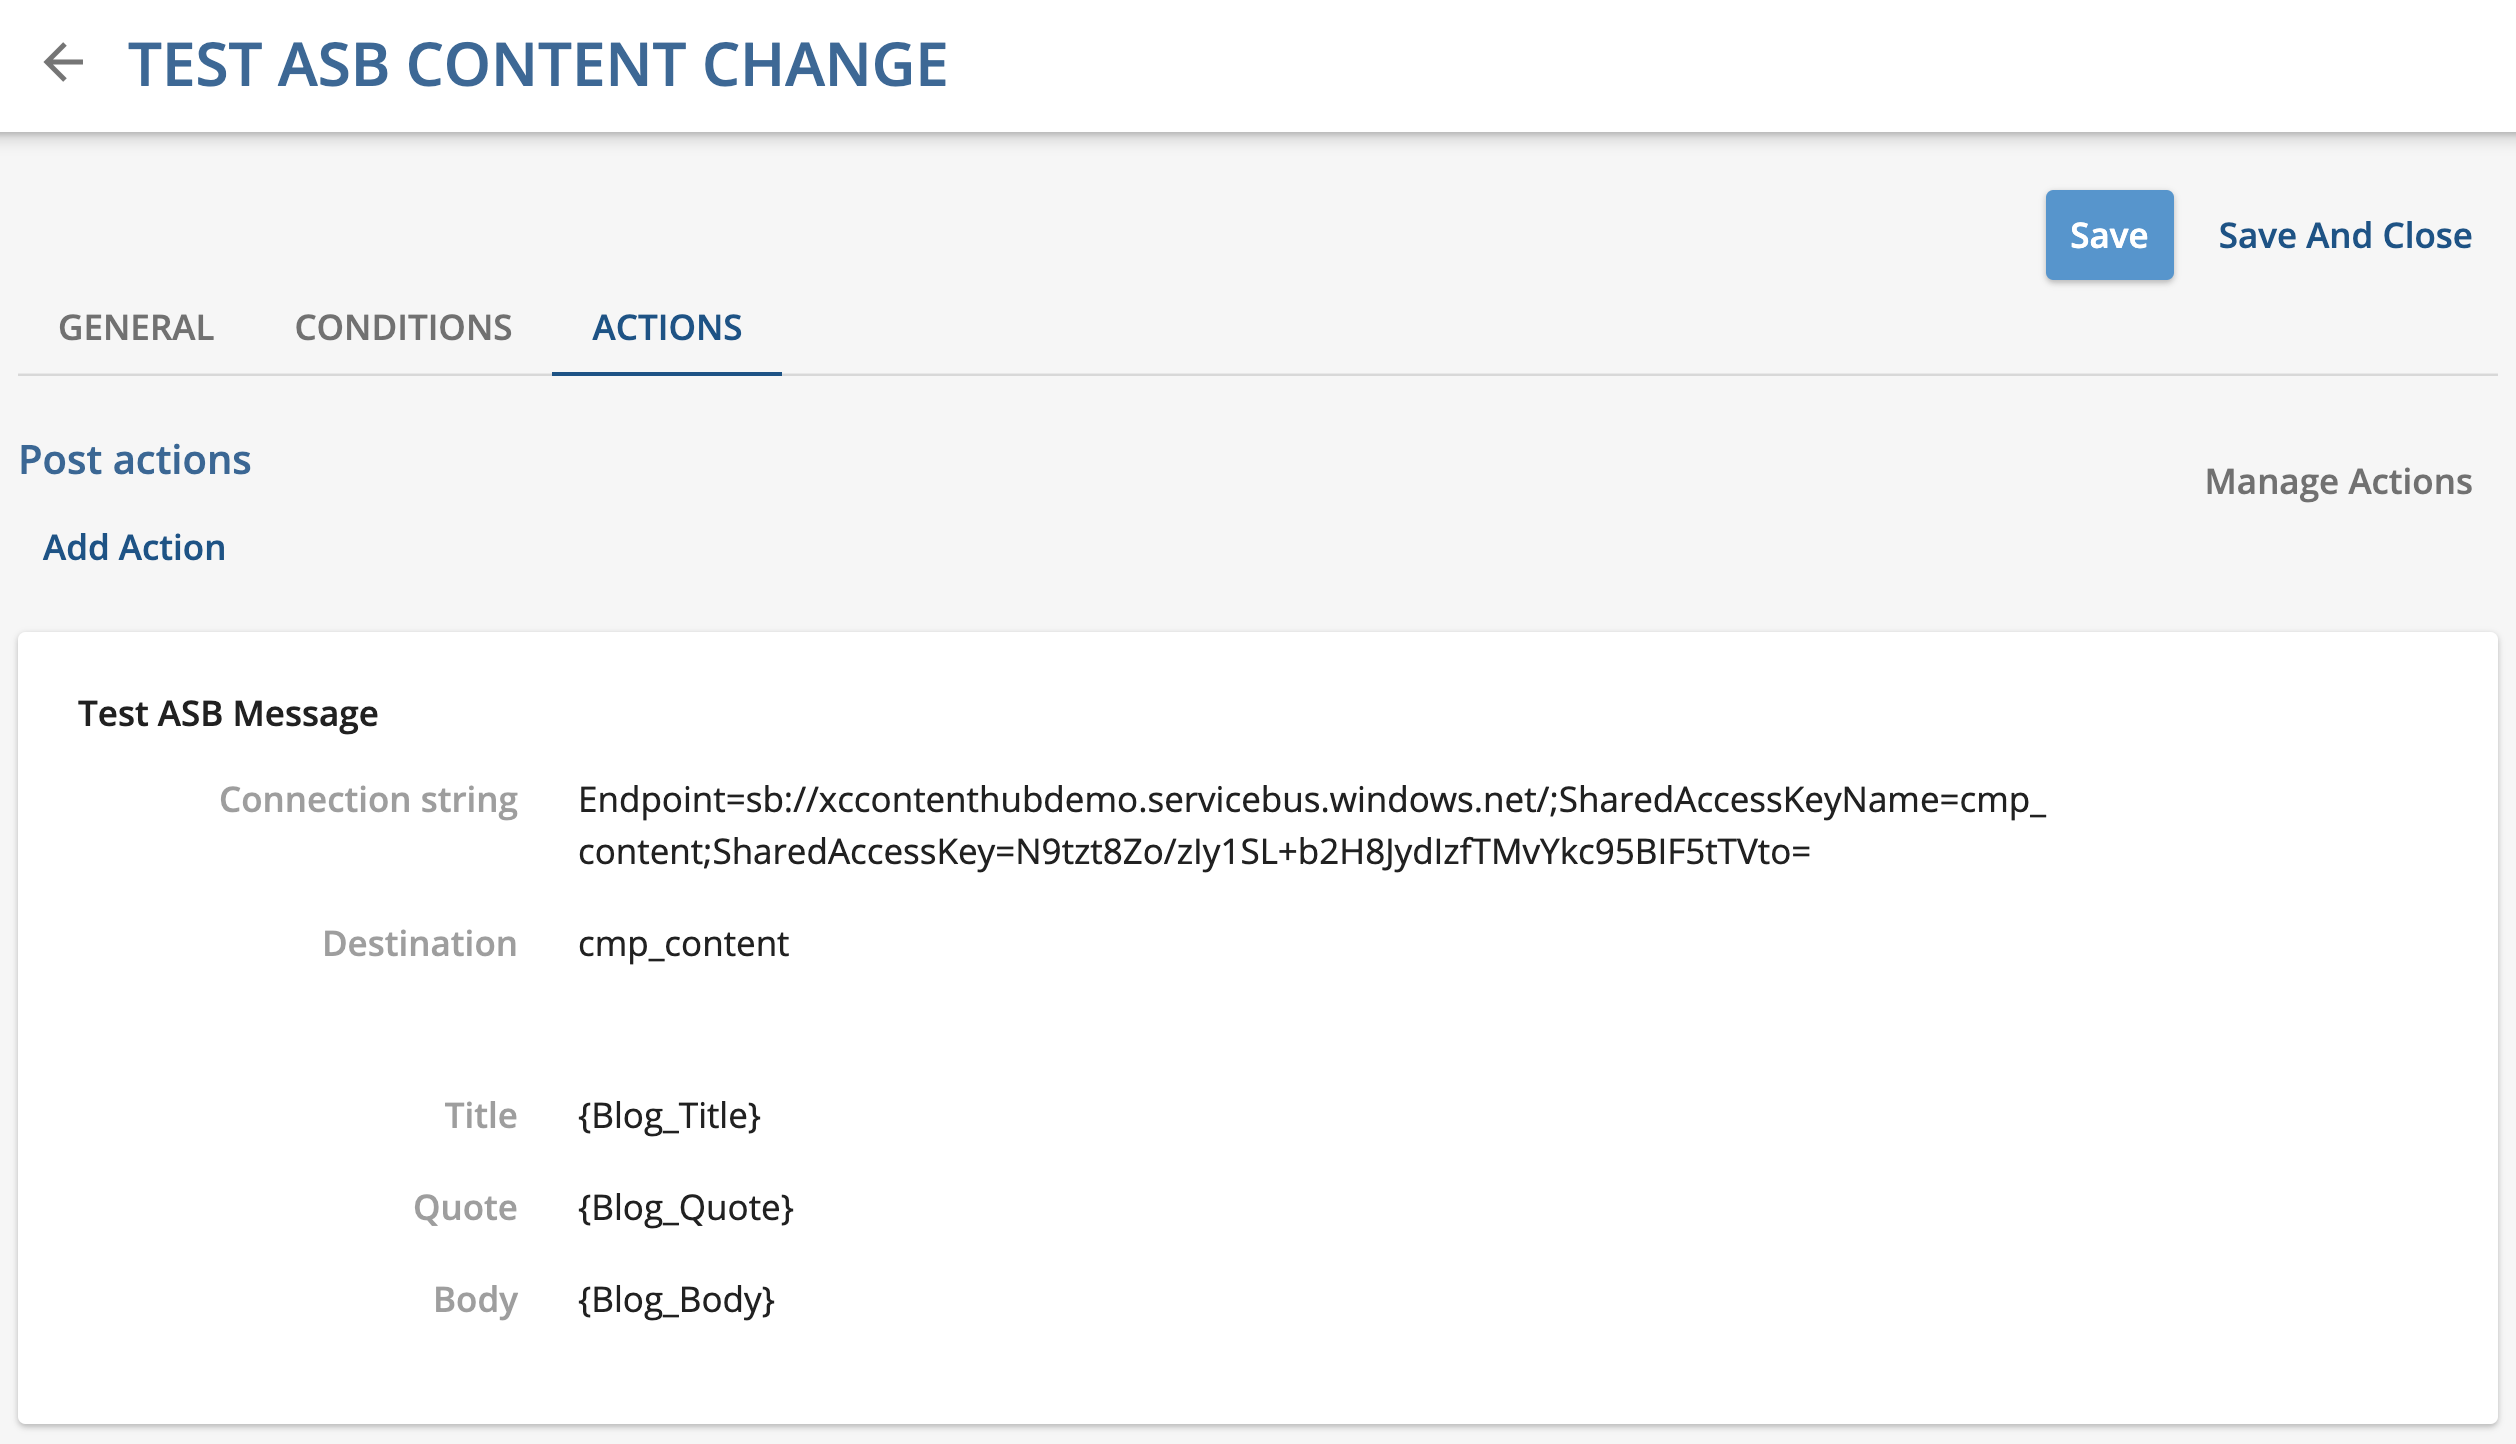
The floowing screenshot shows one example, where entity Title is added to message header and Quote and Body are added as custom values. In this case, the entity is of type M.Content and its Blog variant, which comes to Out-of-the-box (OOB) with many Content Hub default configurations. This will work with any other entity, no matter OOB or defined via custom schema (in Content Hub).
Configuring the Trigger in Content Hub
As described in Sitecore Content Hub documentation, Sitecore Content Hub provides a "Trigger" functionality and such triggers can be defined using Content Hub management/admin UI. A trigger binds an event to one or more actions to be automatically executed when specified events happen and optional conditions are met.
A trigger in Content Hub consists of 3 components:
- Event: The event to which the trigger should react.
- Conditions: The conditions under which the trigger's actions are executed.
- Actions: The actions that the trigger executes.
Below screenshots show how Event, Condition, and Actions can be configured to send M.Content change notifications using above created Service Bus and Action in Content Hub
-
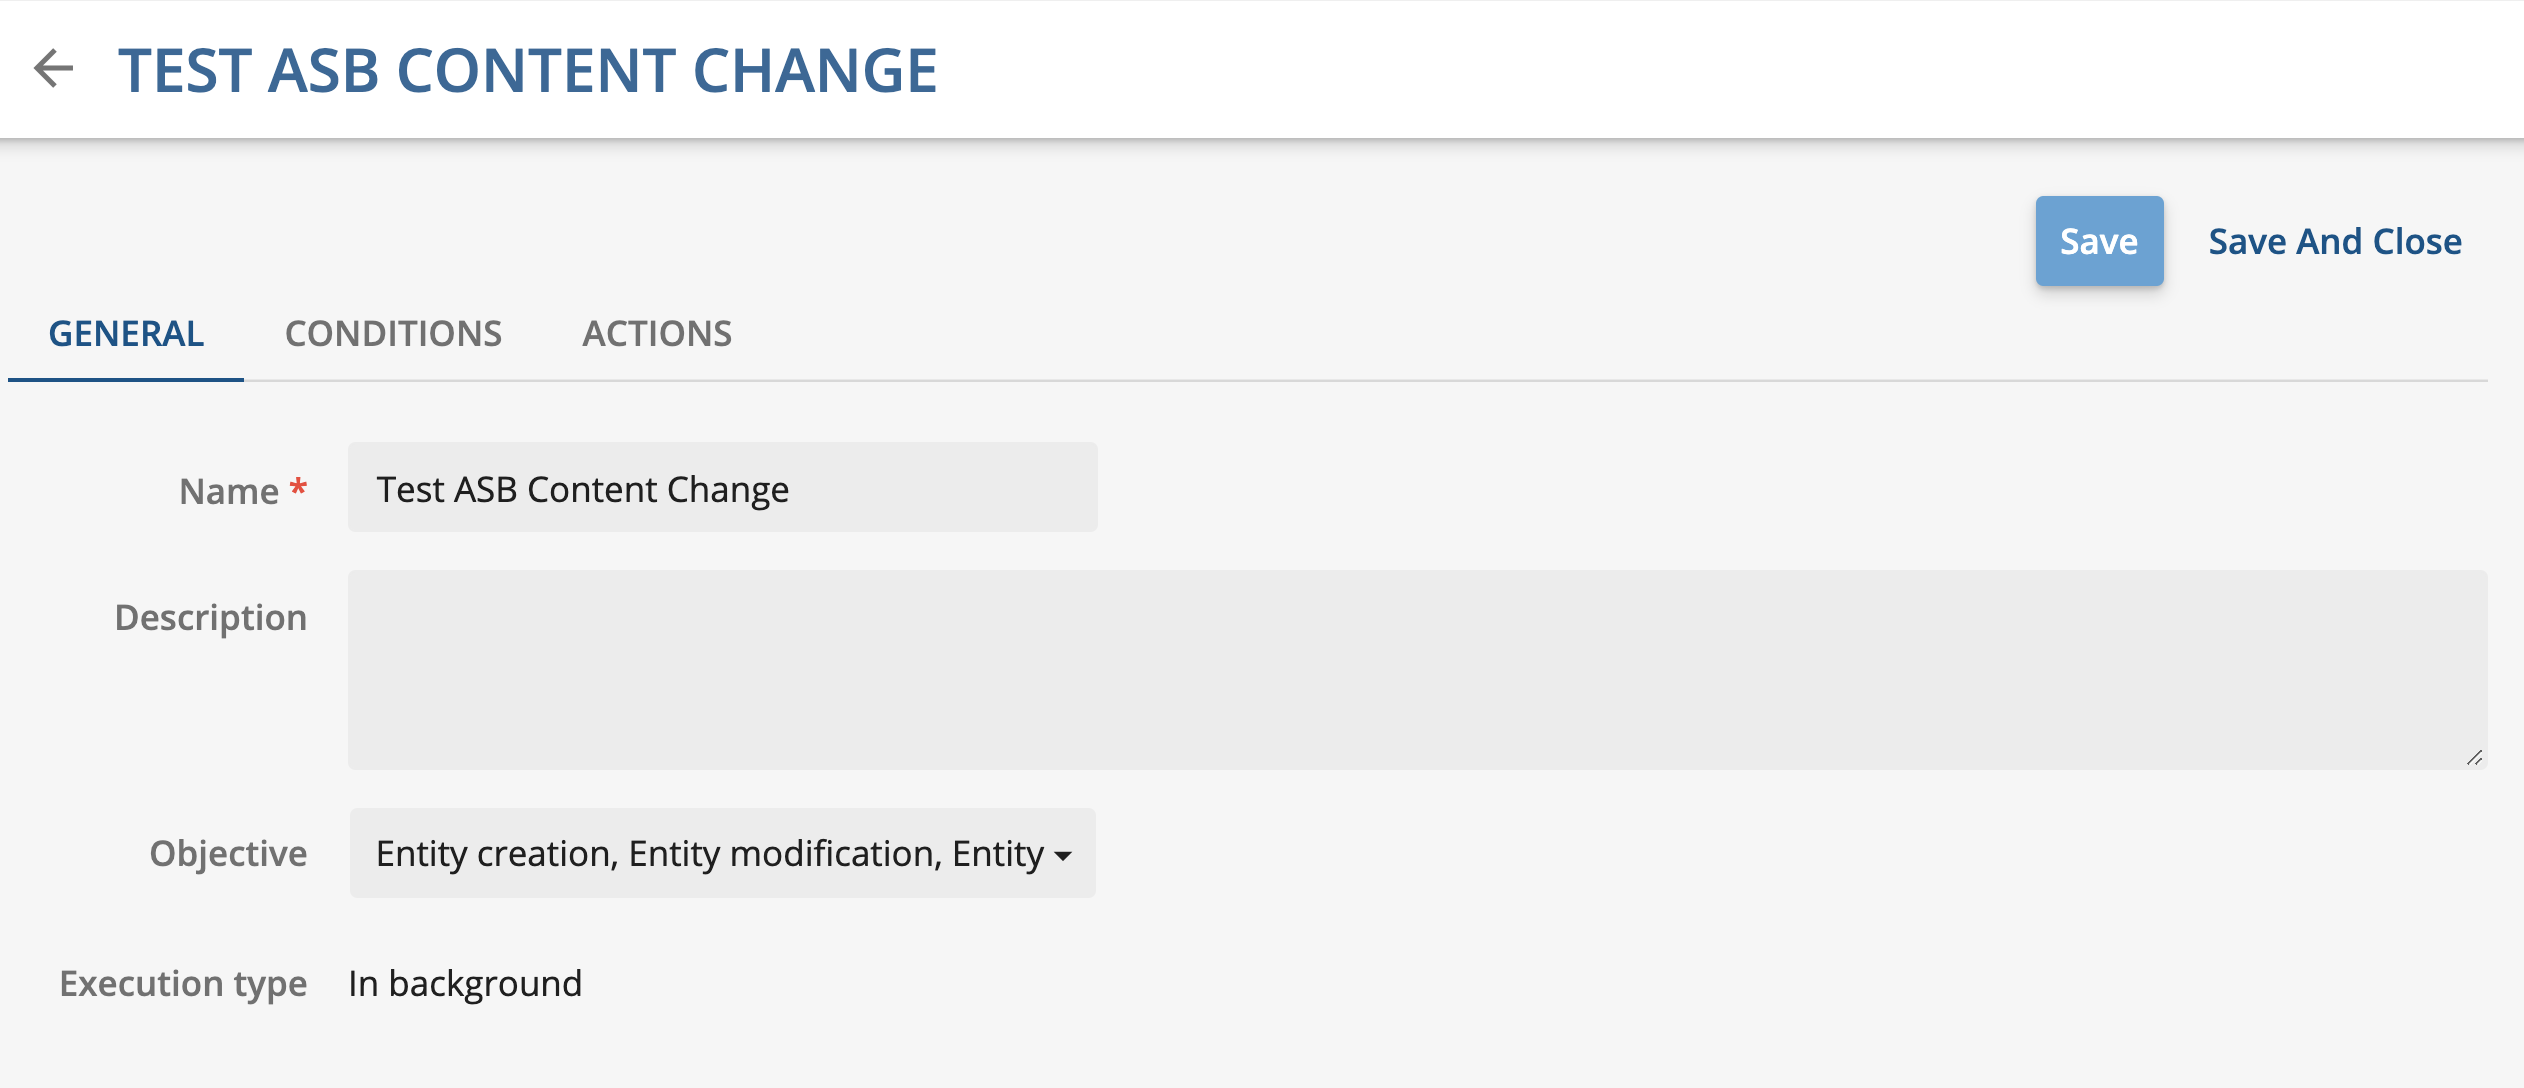
General tab defines the trigger, which can execute when Content Hub entity gets created, updated, and/or deleted. Execution type on below screenshot is set to "In background", which is recommended in most cases to avoid trigger event interfering with the actual process and affecting its performance
-
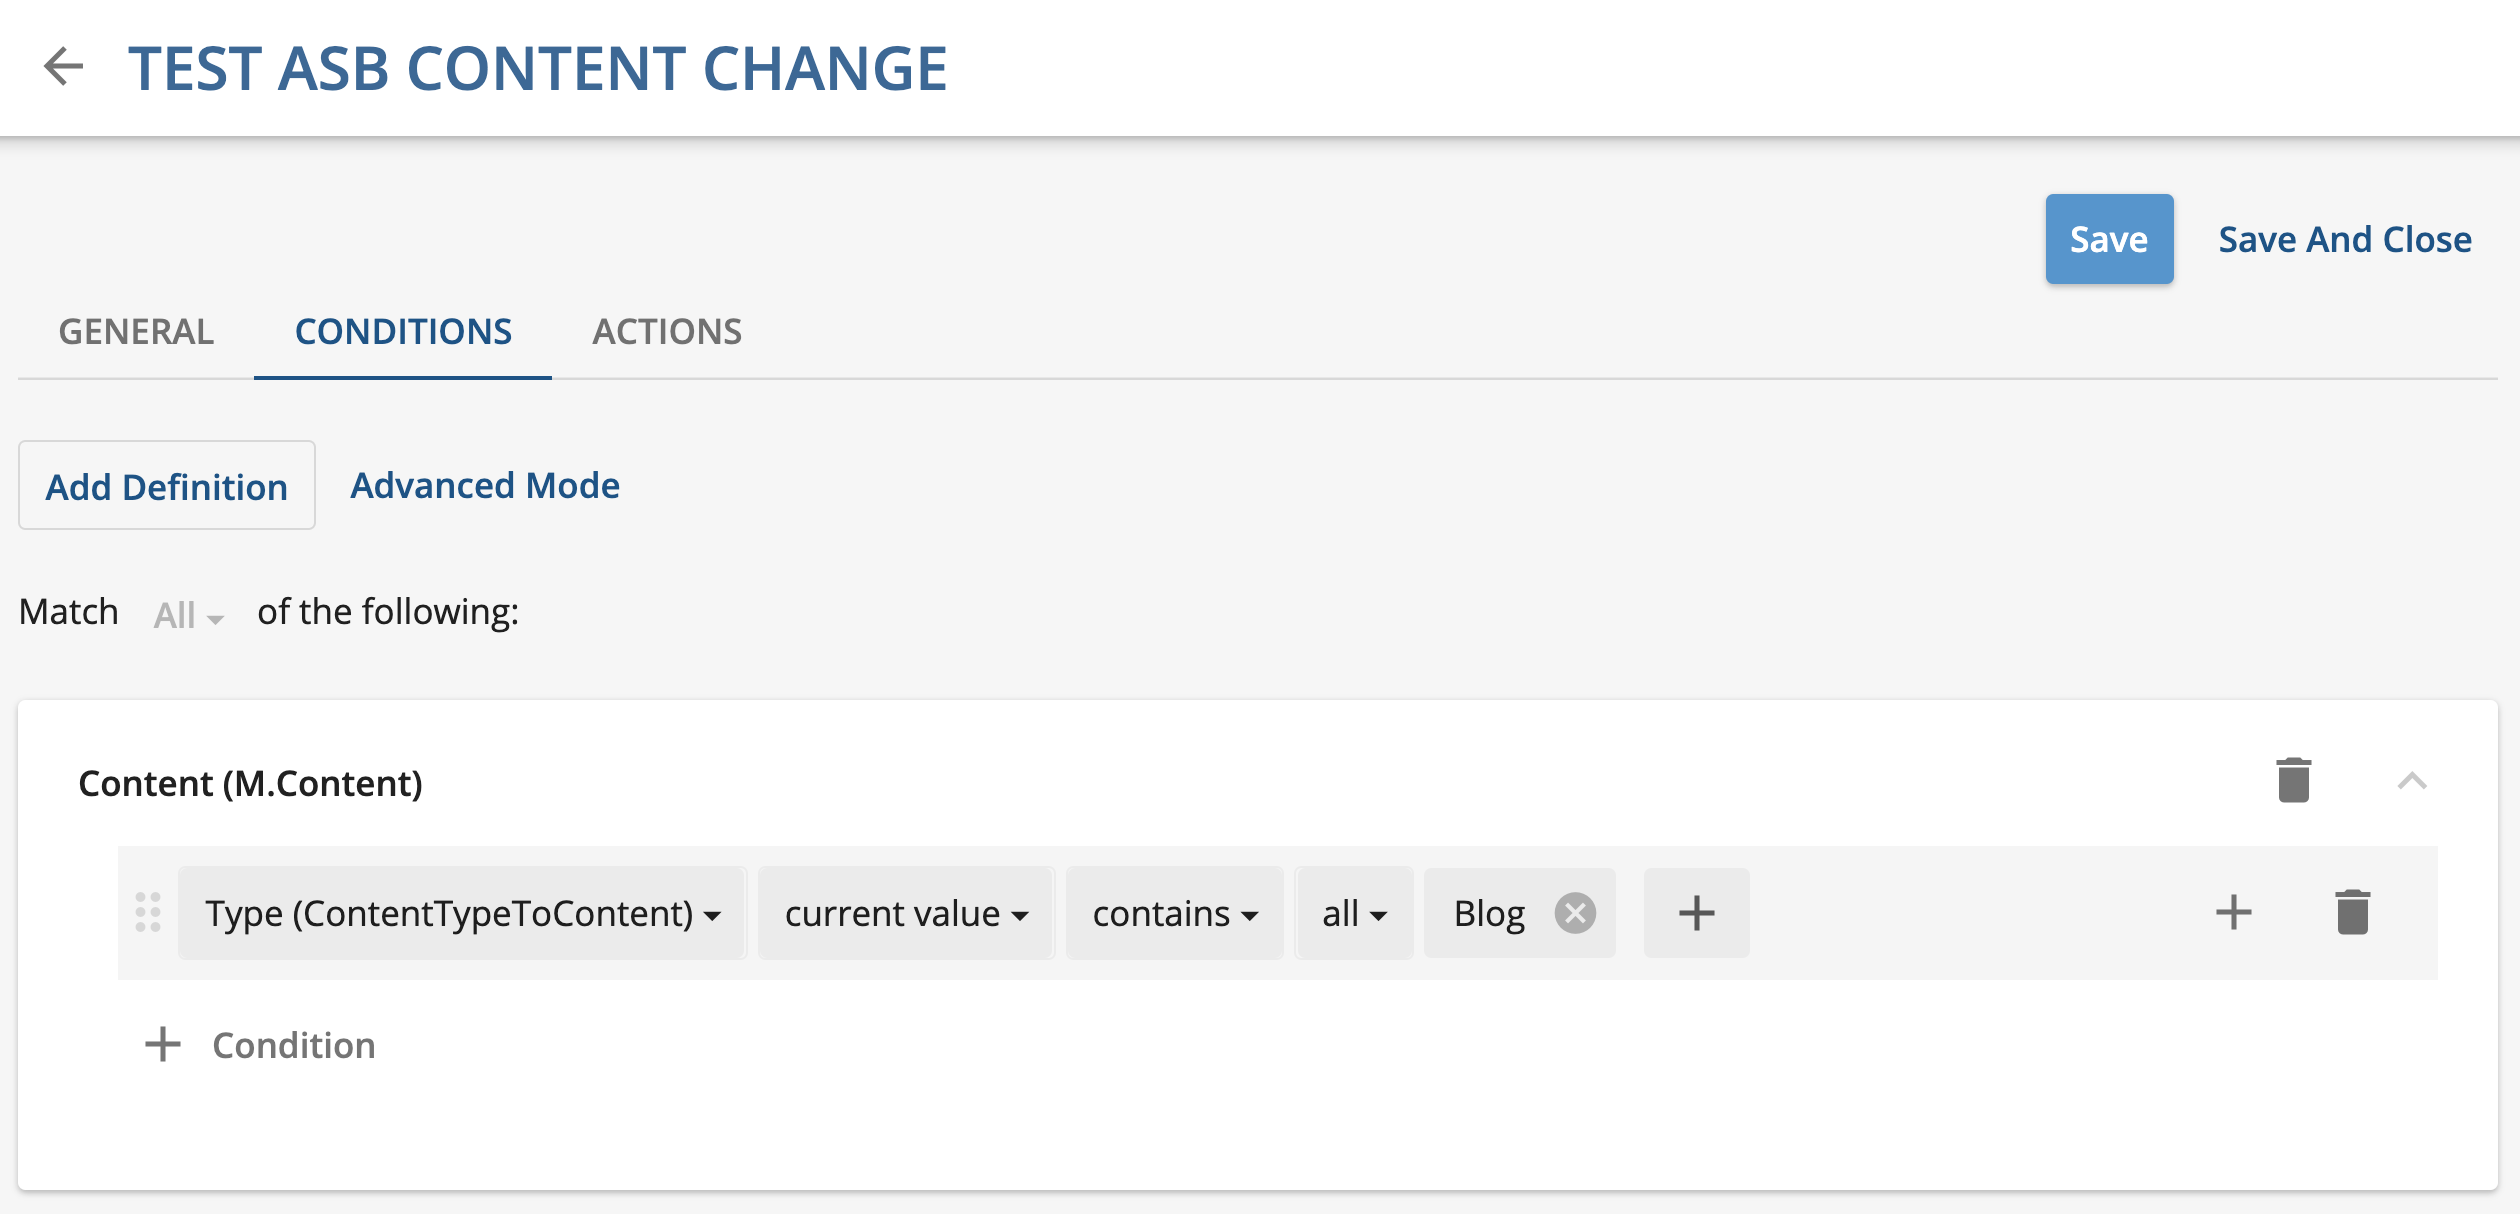
Conditions tab, in below screenshot, specifies that trigger will only fire when entity type is M.Content and its Content Type property is "Blog"
-
And finally, the Action to execute is the one we created on previous steps (it's added via the "Add Action" link). Note that we're not limited to just one action, Content Hub can be configured to execute multiple actions in the same trigger, e.g. send message to Azure Service Bus and then send a notification email to admin users.
Trigger the Update Message
Now to the testing part. Use Entities link from Content Hub Admin page or specific entity management page if one exists to create new or update one of the existing entities of a given type (M.Conetnt with Content Type "Blog" in my example). Within a few seconds, Content Hub should send a message to Azure Service Bus (Assuming everything is set up and configured correctly of course)
Reading Messages from Azure Service Bus
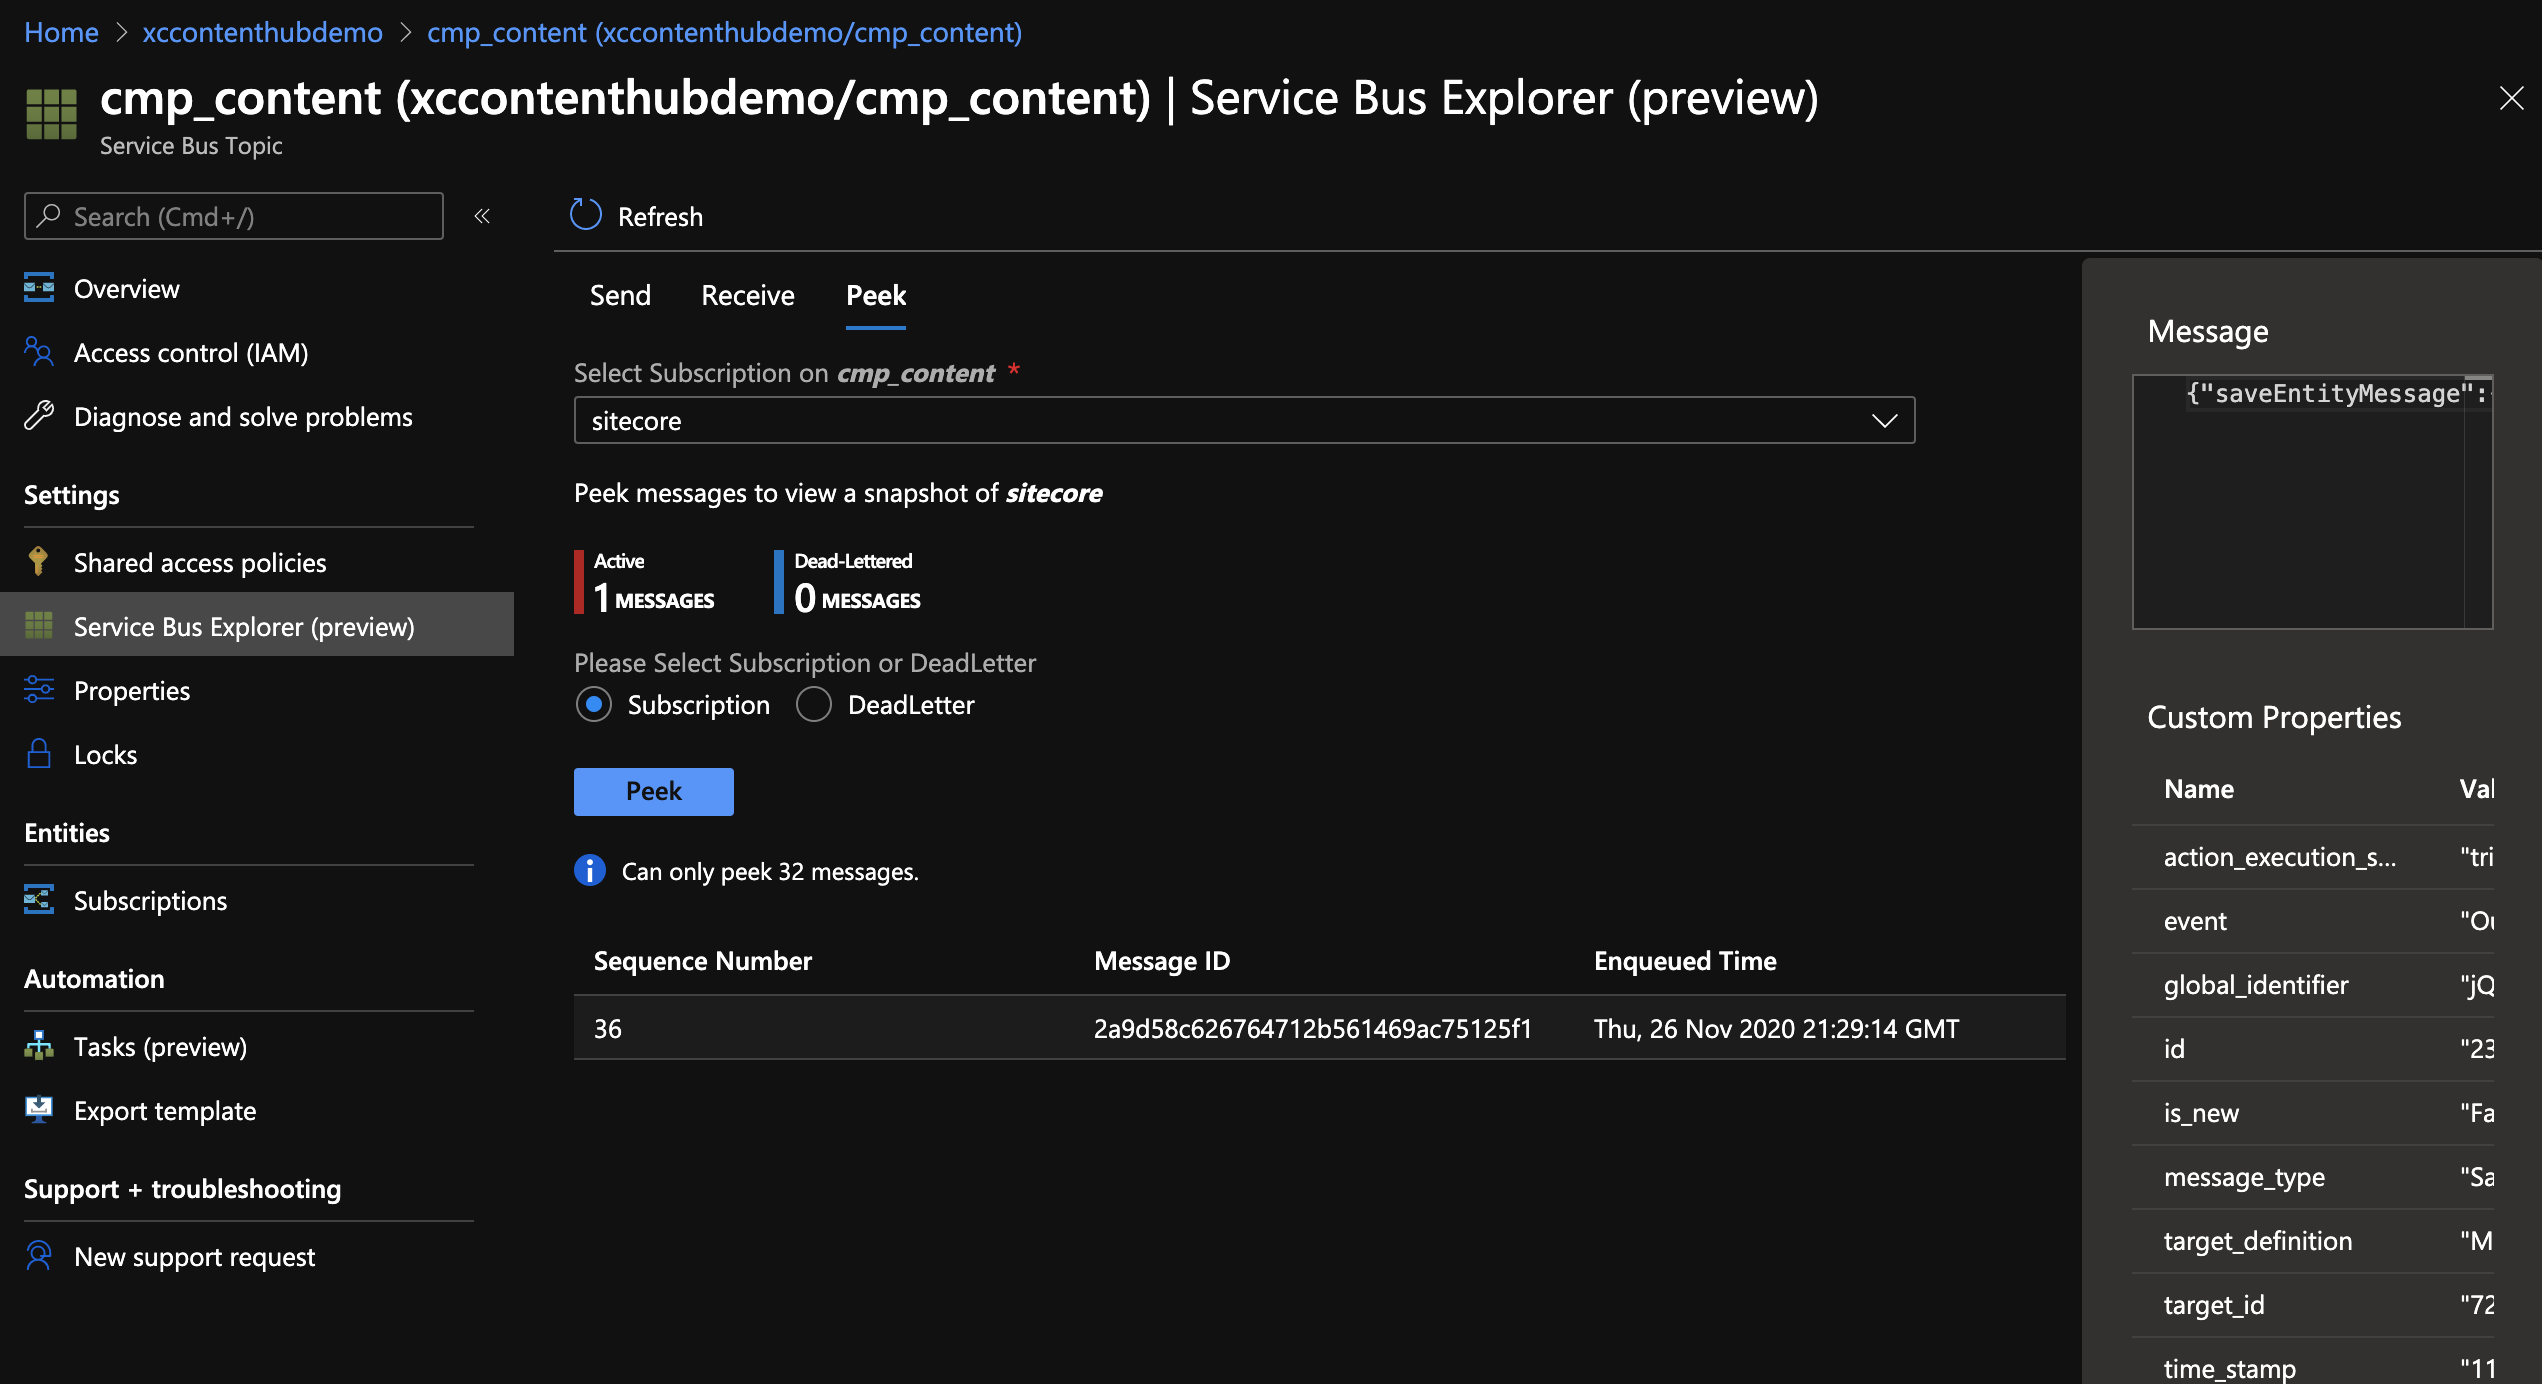
Navigate to the above created Azure Service Bus and topic. Click on the "Service Bus Explorer" link on the left side menu, then select the subscription and navigate to "Peek" on the right pane. The following screenshot is showing the newly created message selected and visible in the right pane.
Message Properties
Content Hub by default appends some of the system properties as "Custom Properties" (those can be seen on the right pane in the above screenshot). target_id is the Entity ID, target_definition is the Entity Definition and message_type specifies the event, which triggered given message.
Message Body
Message body includes some of the system information about the entity, change details, and custom values, which we added to the above steps (under the "context" node)
{
 "saveEntityMessage": {
  "EventType": "EntityUpdated",
  "TimeStamp": "2020-11-26T21:29:03.719Z",
  "IsNew": false,
  "TargetDefinition": "M.Content",
  "TargetId": 72193,
  "TargetIdentifier": "jQ_9Xryr6UihojWlrwrd0g",
  "CreatedOn": "2020-11-26T01:35:19.9869541Z",
  "UserId": 11743,
  "Version": 7,
  "ChangeSet": {
  "PropertyChanges": [
    {
     "Culture": "(Default)",
     "Property": "Blog_Body",
     "Type": "System.String",
     "OriginalValue": "<p>Test Blog Body.</p>\n",
     "NewValue": "<p>Test Blog Body</p>\n"
    }
   ],
   "Cultures": [
    "(Default)"
   ],
   "RelationChanges": [
   ]
  }
 },
  "context": {
  "Title": "Test Blog Title",
  "Quote": "<p>Test Blog Quote</p>\n",
  "Body": "<p>Test Blog Body</p>\n"
 }
}
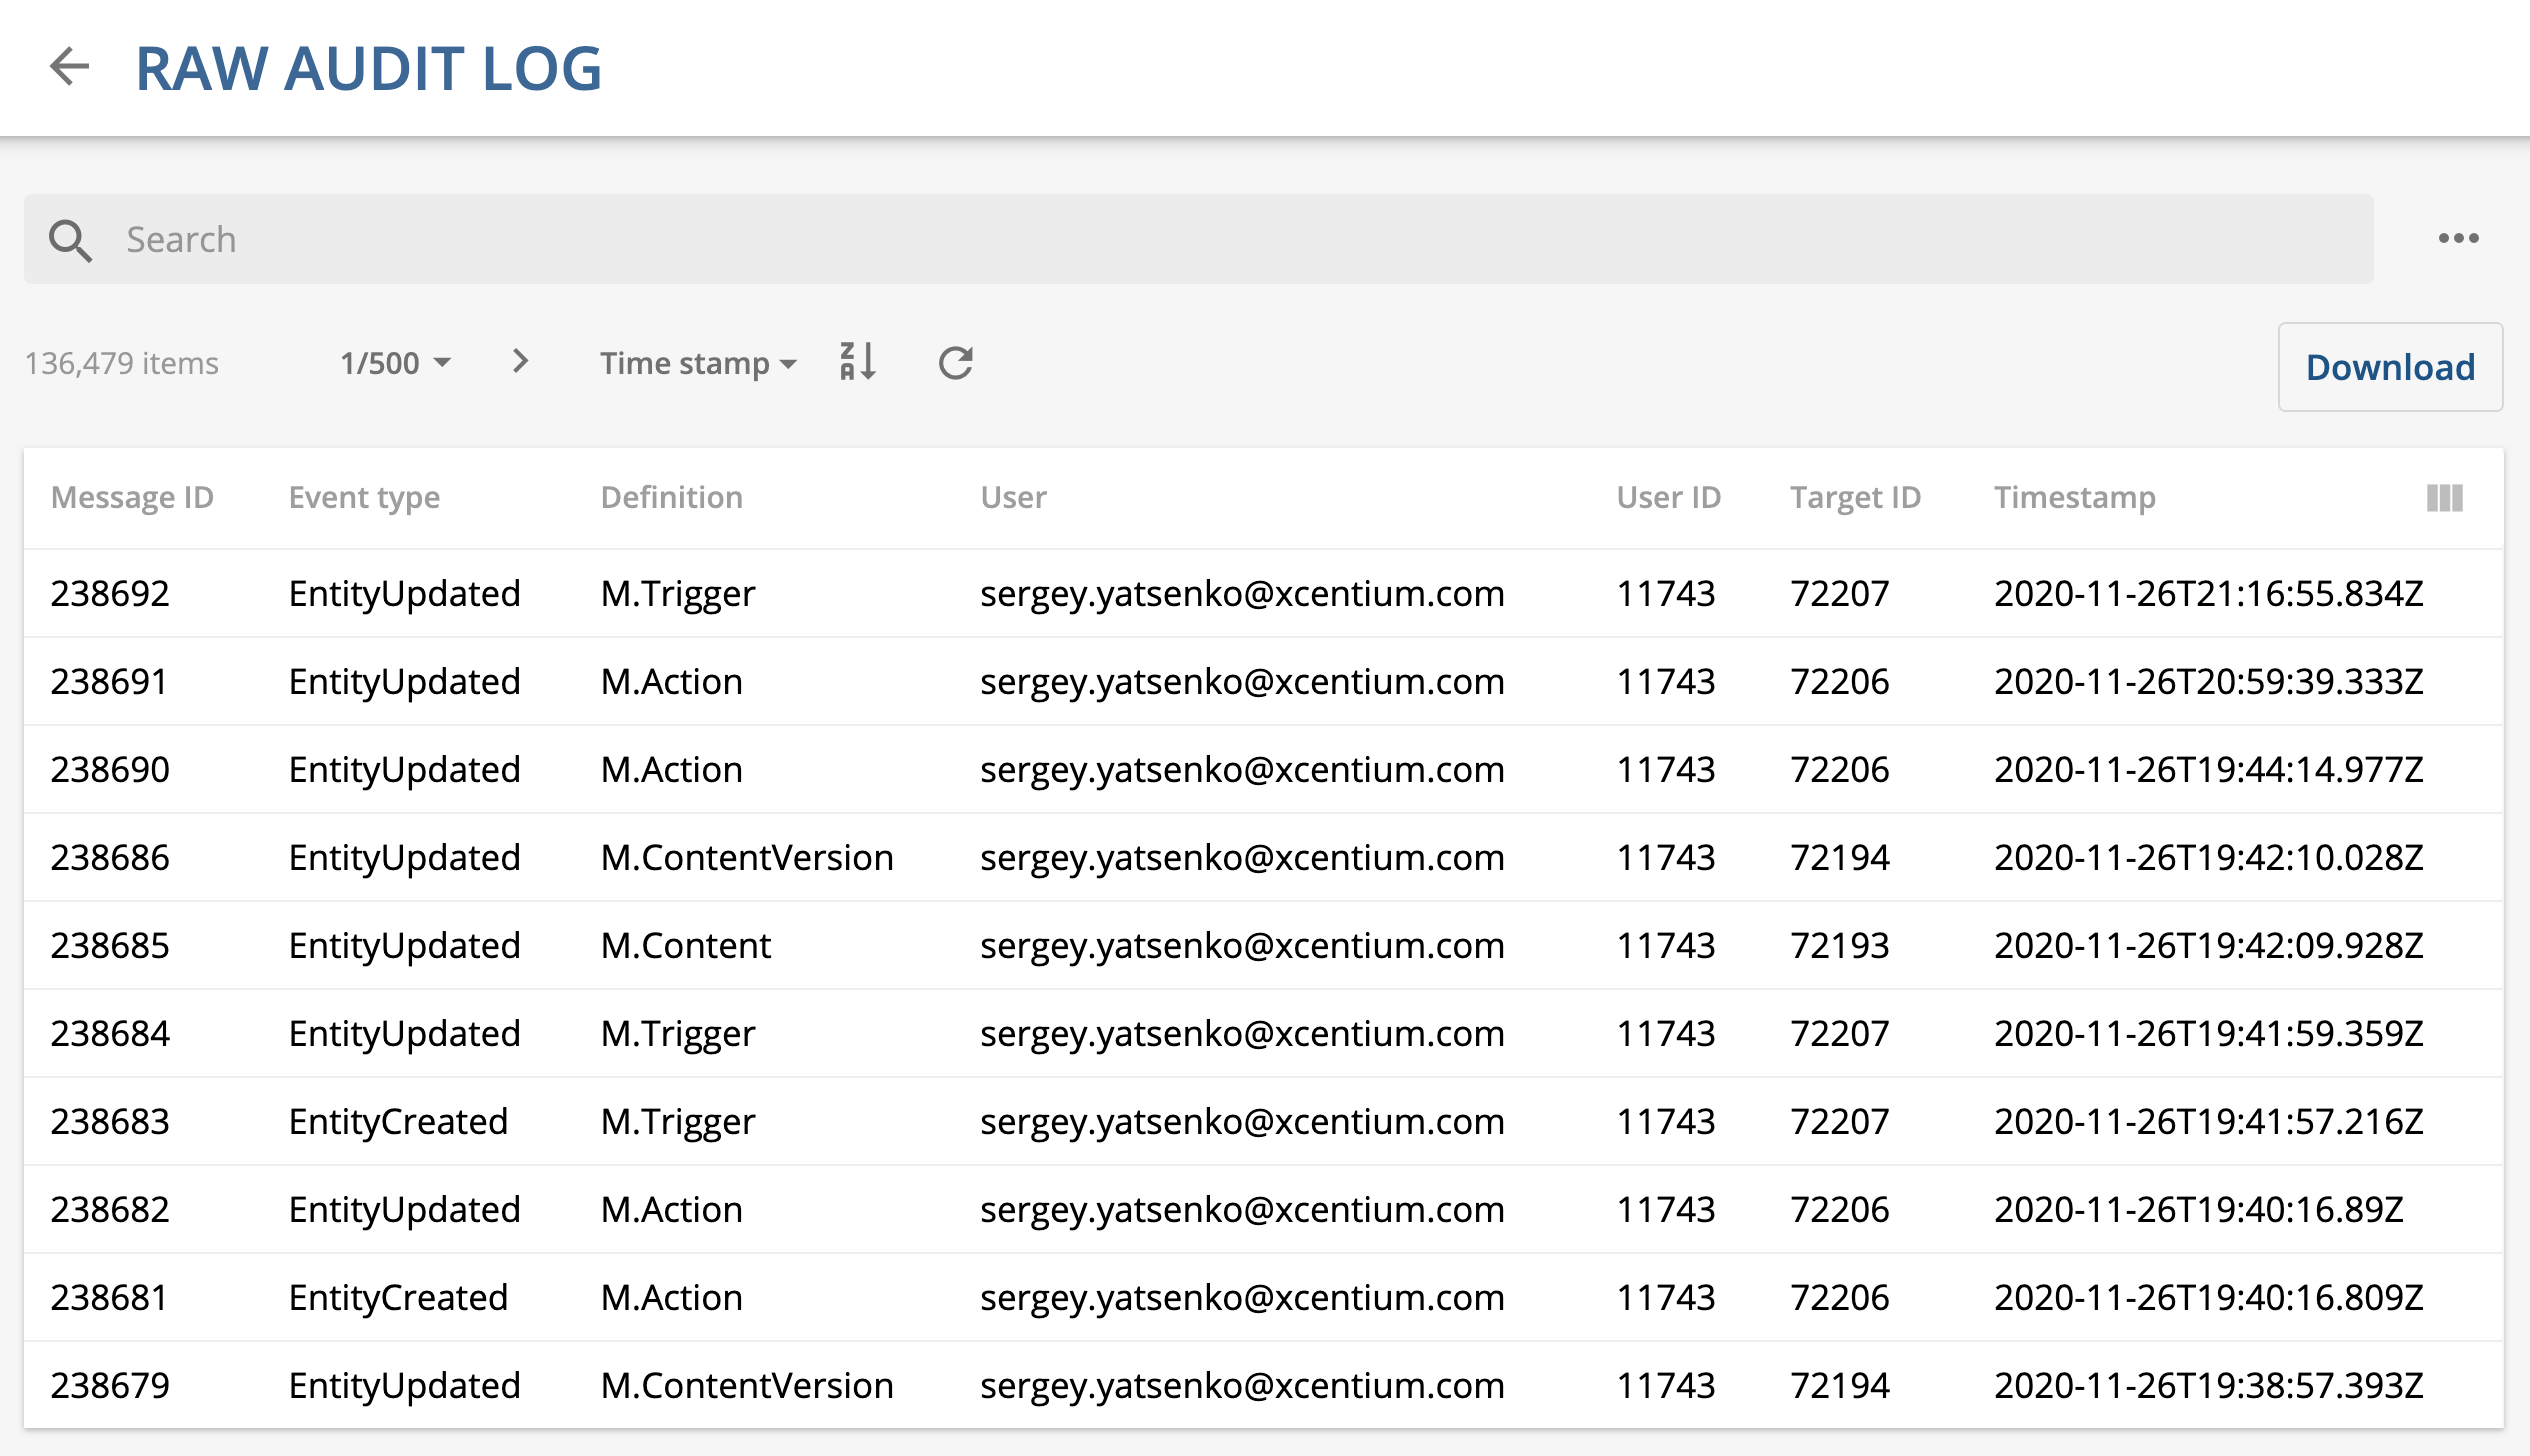
Checking for Errors Content Hub Audit Logs
Content Hub logs user and system actions (triggers included) in the audit log, which can be found under the "Raw Audit Log" link on the admin screen. If things go wrong, this log might be a good place to check.