

XCentium Blogs
Technical
Extending Sitecore Commerce Creating Order History Page in Sample MVC Site
This blog discusses how to extend the sample MVC storefront site that ships with Sitecore Comemerce 7.2.
Sitecore released Sitecore Commerce 7.2 powered by Commerce Server, Sitecore Commerce Connect 7.2 and Sitecore Commerce Server 11.0 in September this year. Sitecore Commerce extends the Sitecore Customer Experience Platform (CEP) by exposing a set of commerce features within Sitecore:
- Catalog Management
- Inventory Management
- Discount Management
- Profile Management
- Orders
- Merchandising Manager
Sitecore Commerce 7.2 is built on top of Sitecore Commerce Connect 7.2 and Commerce Server 11.0.
Sitecore Commerce ships with a sample MVC storefront site that developers can install to play with the application and learn Sitecore Commerce. This blog discusses how to extend the sample MVC site to show order history page for a logged-in user.
In Commerce Server, a basket represents a shopping cart. A user may have multiple baskets with different names (like default basket or wish list). A Purchase Order represents a completed order; i.e. a basket which has already gone through the checkout process. In Commerce Server, all baskets are stored as blob in OrderTemplateAndBaskets table in transaction database and purchase order details are stored as actual values in different tables.
The Sitecore Commerce Server sample MVC site comes with very basic features and it doesn’t have a page to show user Order history details. For this, we need to extend the site to include this behavior. It is a three step process:
- Create a project to include two pages – OrderHistory and OrderDetail pages.
- Change configuration to fetch data from Commerce Server.
- Implement code in OrderHistory and OrderDetail pages to fetch data from commerce server and display onto the site.
Step 1: Follow below steps to create a visual studio project.
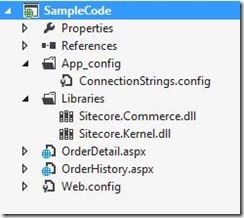
- Create an empty project in Visual studio.
- Copy web.config file from your sitecore site to into the project.
- Create a new folder and name it as “App_config”.
- In “App_config” folder – add existing item and select “connectionstrings.config” from sitecore website (under “app_config” folder).
- Create new folder and name it as “Libraries”.
- Right click on “Libraries” folder and add Existing items. Select “Sitecore.Kernal.dll” and “Sitecore.Commerce.dll” files.
- Right click “References” folder and select “Add reference”. Select assemblies in “Libraries” folder (make sure copy to local is set to true for the assemblies).
- Right click on solution – publish -> use public profile. Select publish method as “File System”. Target location as website location and populate other properties.
Compile and deploy the site and make sure we don’t see any exceptions. Before we develop new pages, let’s understand the profile API which helps us to fetch purchase orders.
Sitecore Commerce Connect expose methods (through class OrderServiceProvider) to access purchase order. OrderServiceProvider is a wrapper class which represents the interaction with the orders leveraging Commerce Connect pipelines. Sitecore has only implement the logic that calls pipelines but the business logic has to be implemented in the pipeline’s processors. Every method receives a request object and returns a result object, for example, SubmitVisitorOrder() receives SubmitVisitorOrderRequest and returns SubmitVisitorOrderResult. The OrderServiceProvider class exposes four methods SubmitVisitorOrder(), GetVisitorOrder(), GetVisitorOrders() and VisitorCancelOrder(). Each method default implementation simply calls corresponding pipelines which is defined in “Sitecore.Commerce.Orders” which exist under website\App_Code\Include folder.
A pipeline is an extensible framework that defines and links one or more stages of a business process, running them in sequence to complete a specific task. The sequence can be changed by swapping the pipeline entries in the configuration file. OrderHeader and Order classes are data objects which represents purchase order (PO) header and purchase order respectively. Order header holds very high level PO details and order holds PO details. The good practice is to fetch PO headers (minimal data) and then load PO details on demand basis.
Step 2: Sitecore Commerce Server has implemented all Sitecore Commerce Connect methods and you can find them in Sitecore.Commerce.Connect.CommerceServer assembly. We need to do below configuration changes in order to fetch purchase order from Commerce Server.
- Open “Sitecore.Commerce.Order.config” from “App_config\config” folder.
- Copy below configuration in Configuration\sitecore\pipelines\commerce.orders.getVisitorOrder node.
<processor type=”Sitecore.Commerce.Connect.CommerceServer.Orders.Pipelines.GetVisitorOrderDetail, Sitecore.Commerce.Connect.CommerceServer” patch:source=”CommerceServer.Connectors.Orders.config”/>
- Copy below configuration in Configuration\sitecore\pipelines\commerce.orders.getVisitorOrders node.
<processor type=”Sitecore.Commerce.Connect.CommerceServer.Orders.Pipelines.GetVisitorOrders, Sitecore.Commerce.Connect.CommerceServer” patch:source=”CommerceServer.Connectors.Orders.config”/>
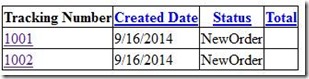
Step 3: To develop Order history feature, we need to create two pages, one page to show all orders and one page to show an order detail page. The below code can be used to fetch all purchase orders from the Commerce Server.
string user_id = “490023AD-C3AA-4091-AA28-7D9D3DE160A1″; //LOAD user ID from session.
string store_name = “Website”; // Change store name.
**var orderService = new OrderServiceProvider();
****var request = new GetVisitorOrdersRequest(user_id, store_name);
****var response = orderService.GetVisitorOrders(request);
**
OrderDetail page can be used to show all details of the order. The below code can be used to fetch purchase order from the Commerce Server.
var orderService = new OrderServiceProvider();
var orderId = Request.QueryString["Id"].ToString();
var request = new GetVisitorOrderRequest(orderId, user_id, store_name);
var response = orderService.GetVisitorOrder(request);

As final step, you can compile the project and publish the site so that the pages are reflected in Sitecore site.