
Optimizely

David Davis
Full Stack Developer
Dynamic Forms
Introduction
At XCentium, we are happy to introduce our newest extension for the Optimizely B2B Configured Commerce platform: Dynamic Forms. XCentium’s Dynamic Forms give you the ability to quickly and easily create custom forms on your website using only the Content Editor (CMS). This article will discuss why we decided to create this extension, highlight some of the features you will get by using it, and a little bit about how we made it work.
Why Dynamic Forms?
Our Optimizely B2B clients often have a handful of custom forms they want to be implemented on their website. Some out-of-the-box widgets will handle lightweight forms, however, some require a degree of configurability. Here are some of the tasks we took to deliver our custom dynamic forms widget:
- A new widget must be built for each field being added to the form.
- A custom state must be created to hold the new form field values as the end-user populates the form.
- Each piece of desired functionality for a widget must be re-implemented for each new form, for example max-length or phone number validation on a text field.
- Each widget must be tested to ensure proper functionality.
- A back-end service must be created to handle the formatting and delivery of the form results to the client.
- A custom email template must be developed to send the form submission results to the client.
- A custom API integration could be requested to post the form submission results to their back-end API.
At XCentium, we envisioned a Form builder that included a series of Widgets that already knew how to work inside the Form using nothing more than the initial CMS configuration.
Adding and Configuring a New Dynamic Form
We designed the form creation experience to be as easy as possible to implement. A new Dynamic Form can be added to any new or existing page. Simply add the Dynamic Form and configure it using the CMS. Once the Dynamic Form is configured, and all Dynamic Form Widgets have been added and configured, the Page must be published. As easy as that, the form is ready for use.
The following settings should be reviewed for the new Dynamic Form:
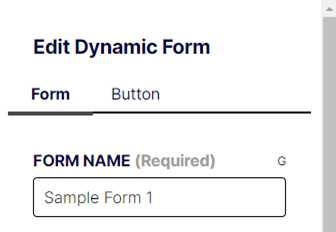
Form Name
This property requires you to set a Form Name. The name should be unique among the Dynamic Forms defined for your site. This value appears as the Subject of the email sent as a result of successfully submitting the form.
Email Recipients
This property requires you to define the email addresses to send the email notification when the form is successfully submitted. Multiple entries should be separated by a comma.
Submit Success Message
This is the message that will appear to the user when the form is successfully submitted.
Include Reset Button
This property allows you to include an optional Reset button on the form.
Submit Button Text
This property allows you to define the label that appears on the Submit button of the form.
Select Button Variant
This property allows you to select from the pre-defined button variants provided by the Optimizely B2B Configured Commerce platform. Options are Primary, Secondary, and Tertiary. This affects the theme applied to the button.
Select Button Shape
This property allows you to select from the pre-defined button shapes provided by the Optimizely B2B Configured Commerce platform. Options are Rectangle, Pill, and Rounded.
Select Button Type
This property allows you to select from the pre-defined button types provided by the Optimizely B2B Configured Commerce platform. Options are Outline and Solid.
Once all Form properties have been configured appropriately, save the Dynamic Form settings.
Overview of Available Dynamic Form Widgets
For the Dynamic Forms to work properly, the form collection fields must be assembled using the available Dynamic Form Widgets. Using a normal Text Field widget on the form will not produce the same results as using the Dynamic Form Text Field widget. We have worked hard to create the base set of Dynamic Form widgets which should allow you to accomplish most form requirements. We will continue to add new features and widgets to the Dynamic Forms solution over time.
Currently, we have the following Dynamic Form Widgets available for use:
Dynamic Form Checkbox
A stand-alone checkbox used for gathering Boolean results. This field can be used to subscribe users to your mailing lists. It could also be used to enforce confirming terms and conditions on a form.
Configuration options include:
- Data Key
- Is Checked by Default
- Is Required
- Label Position (Right, Left or None)
- Label
Dynamic Form Checkbox Group
A group of related checkboxes used for gathering Boolean results. This field can be used to collect product preferences from a list of colors or sizes. It can be configured to force the user to select at least one of the options in the group. It is also configurable to only send checked items in the email notification, making it easier for your employees to see which items were selected from a large list.
Configuration options include:
- Data Key
- Label
- Columns
- Require One Checkbox to be Checked
- Send Value Only if Checked
- Checkboxes
- Data Key
- Is Checked by Default
- Label Position (Right or Left)
- Label
Dynamic Form Select
A dropdown field used to select one item from a list of items. Common form usages include determining in which industry a user works or which state they are located.
Configuration options include:
- Data Key
- Show Label
- Label
- Hint Text
- Required Field
- Options
- Topic
Dynamic Form Text Area
A large text field commonly used for gathering multiple lines of text. Configure the default height of the control by adjusting the number of rows to display.
Configuration options include:
- Data Key
- Label Position (Top, Left or None)
- Label
- Hint Text
- Required Field
- Rows
- Enable Max-Length Constraint
- Maximum Length
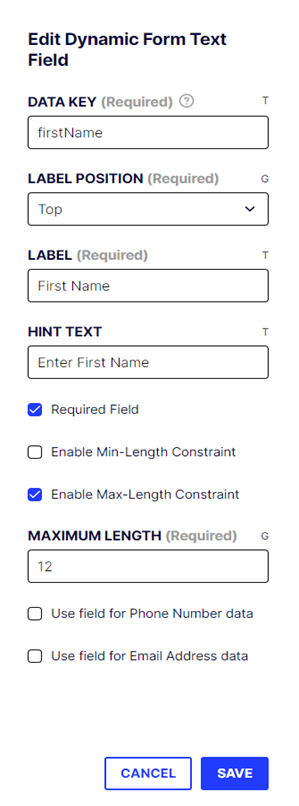
Dynamic Form Text Field
This field is commonly used for gathering single lines of text. There are many configuration options for this widget. Minimum and maximum string lengths can be enforced. The field can be configured to enforce phone number and email address validation on submit.
Configuration options include:
- Data Key
- Label Position (Top, Left or None)
- Label
- Hint Text – Appears as placeholder text on text field.
- Required
- Enable Min-Length Constraint
- Minimum Length
- Enable Max-Length Constraint
- Maximum Length
- Use Field for Phone Number Data
- Use Field for Email Address Data
Adding Dynamic Form Widgets
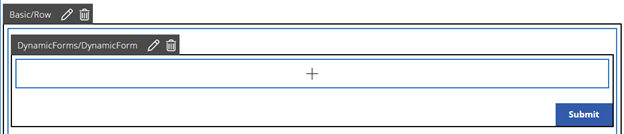
To start adding Dynamic Form Widgets to your Dynamic Form, click on the plus icon INSIDE of the Dynamic Form. This will be the one ABOVE the submit button. If you add Dynamic Form Widgets outside of the Dynamic Form, the widgets will not work properly during form submission. It is perfectly acceptable to add layout elements inside of the Dynamic Form if that is required by your layout.
Configure Dynamic Form Widgets
Configuring the Dynamic Form Widgets was designed to be very straightforward. We tried to name our fields in a meaningful way.
Each Dynamic Form Widget contains its own list of properties that can be configured, as detailed earlier in this article. With a little experimentation, you will quickly discover what each property was designed to do.
Once the Dynamic Form Widget has been properly configured for your form needs, click the Save button and the widget configuration will be saved.
When all Dynamic Form Widgets have been added to the Dynamic Form and you are pleased with your design, publish the Page using the CMS. The form is now ready to use.
The Importance of Form Name and Data Key
For our Dynamic Forms to be truly dynamic, it was important that the Dynamic Form and Dynamic Form Widgets knew how to safely and accurately register themselves into the custom state at run-time. This functionality relies heavily on the Form Name and Data Key properties.
The Dynamic Form is registered using the Form Name property of the form. This is why the Form Name must be unique amongst all Dynamic Forms configured for the website.
Within the Dynamic Form, each Dynamic Form Widget will be registered into the state using the Data Key as the unique identifier. The rules here are a little more relaxed as the Data Key only needs to be unique within the specific form being designed. Dynamic Form 1 can contain a FirstName Data Key and Dynamic Form 2 can contain a FirstName Data Key, even if they are on the same page.
With a properly configured Form Name and Data Key, the Dynamic Form Widget is provided a place in the state to maintain its current value.
Additionally, when posting your form data to a third-party API, these form names will match what you configure for your third party’s form post endpoint.
Summary
This article provides you with an understanding of how our Dynamic Forms enhancement will take your Optimizely B2B Configured Commerce forms to the next level, saving you and your team the effort and ensuring your form is functional.
Thank you for your time, I hope you found this article useful. Feel free to reach out to me or XCentium directly if you have questions or feel interested in any of our custom solutions for the Optimizely B2B Configured Commerce platform. We would love to work with you to help maximize your investment in Optimizely B2B Configured Commerce.