

Matt Kloss
Vice President of Client Services
Creating a Mirrored SQL Environment for Sitecore 7
This is a step-by-step guide how to set SQL Mirroring for your Sitecore web site. Mirroring offers data redundancy and provides superior up-time by ensuring continuous data availability. This helps during upgrades, planned outages, and disasters… For this reason, it is often recoomened that your Mirror and Principal server not be located at the same physical location. Lastly, mirroring is not clustering and will not enhance the performance of your Sitecore site, mirroring only assists with data availability.
Server Setup
-
Setup 3 servers (Windows servers 2008 r2 or later)
-
Verify all servers are patched with most recent updates and service packs.
-
Principal SQL Sever
- Install SQL 2008 or later Standard or Enterprise
- Update SQL with most recent Cumulative Update
- Ensure port 1433 is open and SQL accepts outside connections.
-
Mirror SQL Server
- Install the exact same version of SQL as the Principal server
- Update SQL with the same patches as the Principal server
- Ensure port 1433 is open and SQL accepts outside connections.
-
Witness SQL Server
- Install SQL Express (no need to pay for an additional license)
- This server does not contain any Sitecore data, its primary function is to determine when something is wrong with the Principal server and trigger the failover.
- Ensure port 1433 is open and SQL accepts outside connections.
- Install SQL Express (no need to pay for an additional license)
SQL Setup
- Download the Sitecore SQL Databases to the Principal server
- When installing, if you can, have SQL Server running under an AD account. Use the same account for all three servers.
- You’ll also want to select mixed authentication mode so your site can connect.
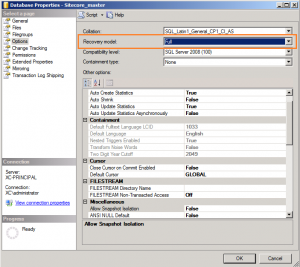
- On the Principal server, set all of the Sitecore databases to Full Recovery model.
- This can be found by right clicking on the database, selecting properties, options and selecting Full from the Recovery model: drop down.
- Create a backup of each Sitecore Database on the Principal server.
- Copy the backups to the Mirror server
- Create an empty database for each backup you have. Name them the same as they are on the Principal server
- Restore the backups with the following options – located on the Options tab
- Overwrite the existing database (WITH REPALCE)
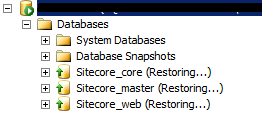
- Restore with NORECOVERY
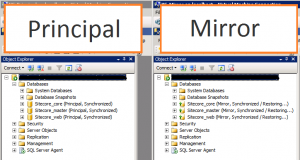
- When the database is finished restoring, you’ll notice it is in (Restoring…) mode – This is expected
Mirroring Setup
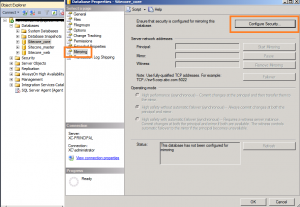
- Return to the Principal server
- Right click on the core database and select Properties then select Mirroring and Configure Security.
- On the Include Witness screen, select yes and click Next.
- Make sure all 3 servers are checked on the Choose Servers to Configure screen.
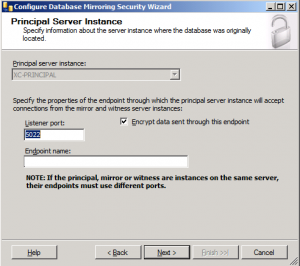
- On the Principal Server Instance screen ensure that your Principal Server is selected
- On the Mirror Server Instance screen, browse to your Mirror server
- Use the FQDN, not an IP
- On the Witness Server Instance screen, browse to your Witness server
- Use the FQDN, not an IP
- Enter the accounts for each server
- Start Mirroring!
- Repeat for all other Sitecore databases
Sitecore Setup
- Open the Web.Config and search for RETRYER
- Change the disabled parameter from true, to false.
- <retryer disabled=”false” type=”Sitecore.Data.DataProviders.Retryer, Sitecore.Kernel”>
- Change the disabled parameter from true, to false.
- Open the ConnectionStrings.Config file
- Update each databases’ connection string that is mirrored with the parameter Failover
- Failover Partner=XC-Mirror;
- Make sure the user you specify in the connectionstring.config has been created on both the Principal and the Mirror SQL server
- Update each databases’ connection string that is mirrored with the parameter Failover

Thats it! As a test, try stopping SQL on your Principal server – your site should continue to run.
Some Useful SQL Commands
select state_desc from sys.database_mirroring_endpoints
ALTER DATABASE TestMirror SET PARTNER = ‘TCP://hostname:5022′
ALTER DATABASE TestMirror SET PARTNER off