

Graeme Ward
Salesforce Developer
B2B Lightning Checkout Service Registration
A deeper dive into the newly release Salesforce Lightning B2B Commerce Flows: Registration Services
With the Summer 2020 release, Salesforce is launching their B2B commerce functionality on lightning communities. The data model is built on standard Salesforce objects, and storefronts are constructed with lightning web components in the community experience builder. The way lightning storefronts are constructed is radically different from the previous VisualForce method. Lets take a closer look.
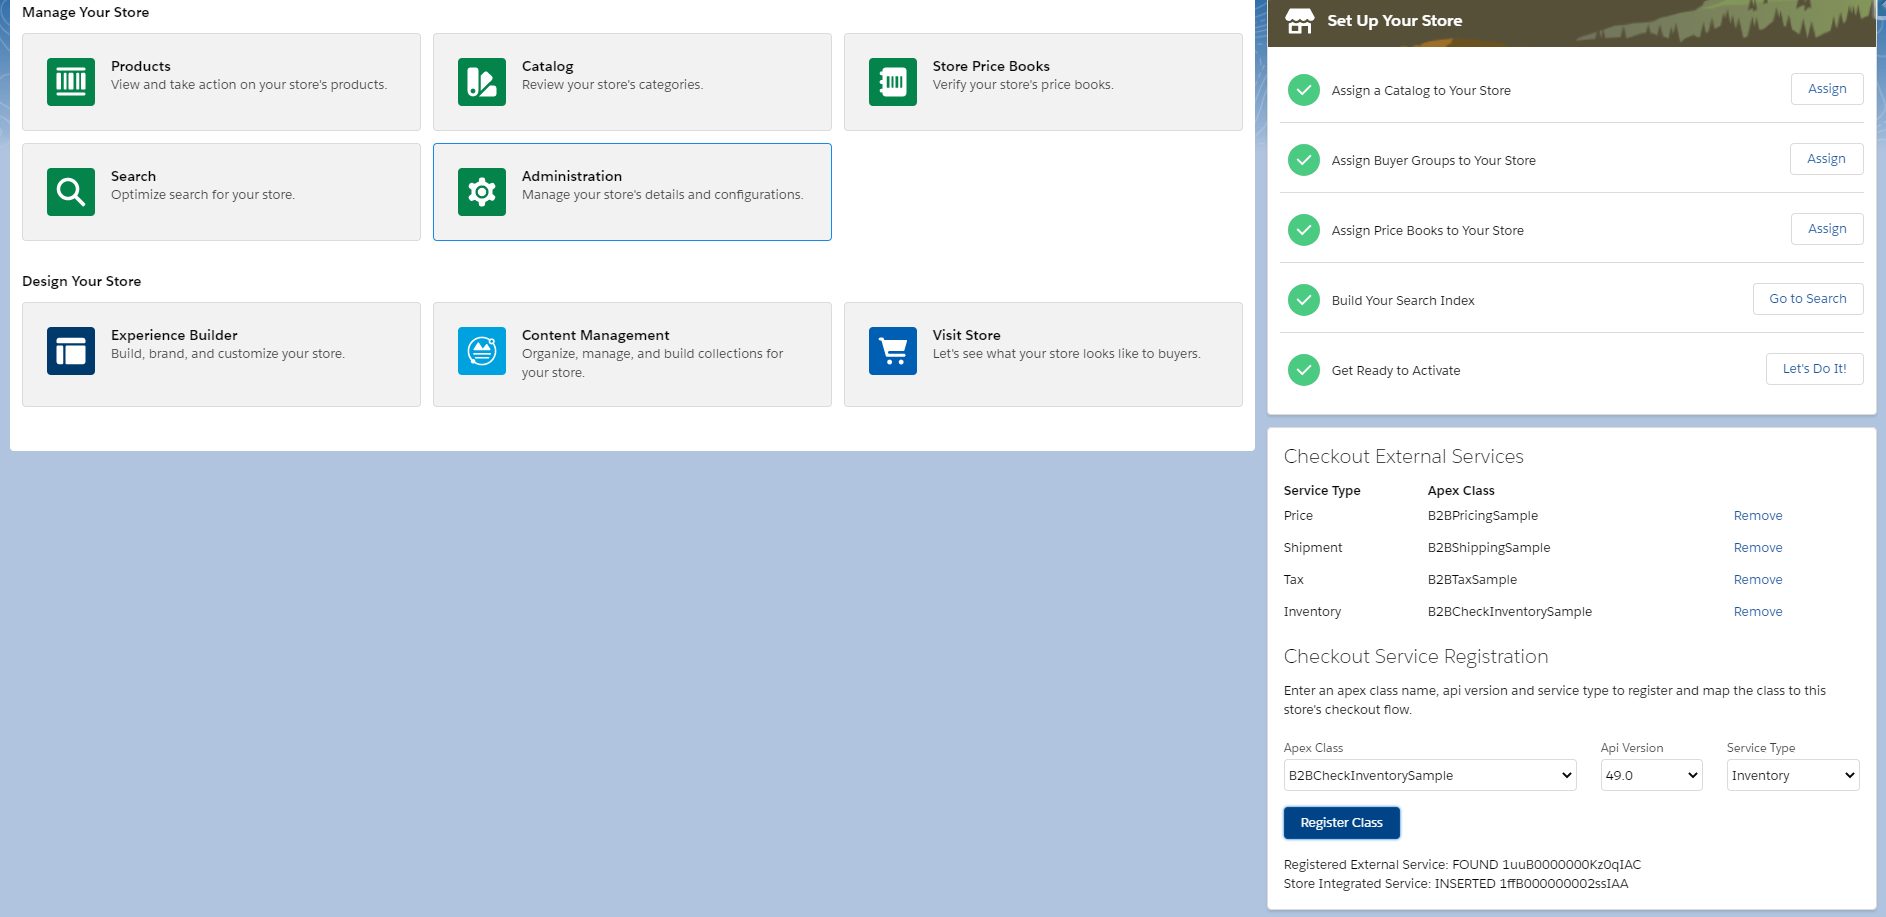
One of the new changes is the way external services are connected to the checkout flow. Salesforce provides some out of the box sample Apex classes for inventory, pricing, shipping and tax integrations to give us a sense of what these integration classes might look like. However, we still must register those classes and map them to our storefront. I’m currently using a lightning commerce preview sandbox, and the sample classes are as follows:
Class Name
Interface
B2BCheckInventorySample
sfdc_checkout.CartInventoryValidation
B2BPricingSample
sfdc_checkout.CartPriceCalculations
B2BShippingSample
sfdc_checkout.CartShippingCharges
B2BTaxSample
sfdc_checkout.CartTaxCalculation
In upcoming releases, Salesforce will be including a UI component to handle this egistration process, but for now storefront developers must use Workbench to query the appropriate ids, and insert the setup records. This is a somewhat onerous process, querying the storefront id, creating a csv file to insert the RegisteredExternalService records, then writing those ids to another csv to create the StoreIntegratedService records. In this post, we’ll discuss some of the considerations for creating our own UI component to configure external services for the checkout flow and bypass the Workbench process.
Our first step is to reference the Lightning B2B Commerce Developer Guide. This will give us a starting point for the code we’ll need to register our external services.
Note the hardcoded values in the sample code. We’re essentially creating a form that storefront admins can use to pass parameters to this code. Any hardcoded value in this sample code will be populated by that form. So, from the sample we can infer that the user will need to provide the Webstore name, Apex class name, API version, and the provider type (the registeredDevName can be inferred by the provider type, so there is no need for a separate input).
For the apex class you can use a simple text input, but I recommend running a method when the component loads to populate an Apex class picklist with all active Apex classes to avoid user error. The sample code specifies API version 48.0, but the new B2B commerce functionality is built on version 49.0, so I recommend not allowing users to pick earlier versions.
Currently there are four possible provider types. These values cannot be retrieved from anywhere, so this picklist will be hardcoded.
- Inventory
- Shipment
- Price
- Tax
The webstore name does not actually need to be a user input as it’s only being used to retrieve the webstore id. The storefront homepage where we’ll install our component is actually a record page, so the webstore id is readily accessible to any component on that page. We’ll access it in our component with “@api recordId”.
Now we can create the Apex methods to create the RegisteredExternalService and StoreIntegratedService records when the form is submitted. Your LWC JavaScript might look something like this, where registerExternalService and createStoreIntegratedService are imported Apex methods. The Apex will be modifications of the sample code that accepts the necessary parameters.
registerExternalService() {

    let criteria = {

        webstoreId : this.recordId,

        apexClassId : this.apexClassId,

        apiVersion : this.apiVersion,

        serviceType : this.serviceType

    }


    registerExternalService(criteria)

    .then(result => {

        this.messages = result.messages;

        this.errorMessages = result.errorMessages;


        if (this.errorMessages.length ===
createStoreIntegratedService(registeredIntegrationId) {

    let criteria = {

        webstoreId : this.recordId,

        registeredIntegrationId : registeredIntegrationId,

        serviceType : this.serviceType

    }


    createStoreIntegratedService(criteria)

    .then(result => {

        this.messages.push(result.messages);

        this.errorMessages = result.errorMessages;

        this.getCheckoutExternalServices();

    })

    .catch(error => {

        console.log(error);

        this.dispatchEvent(

            new ShowToastEvent({

                title: 'Error',

                message: JSON.stringify(error),

                variant: 'error',

            }),

        );

    })

}
Every developer will have their own approach, but here are some considerations:
1) The RegisteredExternalService object is a setup object, so we can’t perform both of these operations in one context. Instead, we need to create the RegisteredExternalService record and pass its Id back to our web component, then make another server call to create the StoreIntegratedService record.
2) You can see from my screenshot that I’ve also added a table to display existing checkout registrations and the option to remove them, which is useful for knowing which class each service maps to, or if a service needs to be mapped to a different class.
3) You might have noticed in the code sample that the prefixedName is written to the Integration field when created the StoreIntegratedService, but in the sample table provided the RegisteredExternalService Id is used. I found that the Integration field reverted to the prefixedName even when I used the RegisteredExternalService Id. This became relevant when I added the functionality to display existing external services and their associated Apex class. Retrieving the correct RegisteredExternalService becomes more complex, especially in orgs with multiple storefronts.
4) Make sure to add some error handling to the component to tell the user if the service they are trying to create already exists, or if the Apex class doesn’t implement the matching interface for the service provider type.
It’s worth noting that the StoreIntegratedService object is also used when setting up Payment Gateways. Modifying your checkout registration component so that it can also configure payment gateways is a logical leap. There are plenty of enhancement options, just be aware that Salesforce does plan to release a component of their own in the near future. Until we see what functionality they will offer out of the box, this is more of an exercise in understanding external service registration than providing long term configuration benefits to your storefront administrators.